
|
I wrote in my previous blog post about why I began making shirts for my husband. So far I have only made two shirts from his custom-fit sloper, so we are still on the long journey of tweaking the fit. I made two basic patterns, one a 'standard' fit and one 'closer fit'. I usually make him an article of clothing for every gift-giving holiday. A few months ago I found some red/blue cross dyed cotton/linen on clearance in my local quilt store, and thought it would be perfect for a shirt. On the day I went to cut out this shirt, we were having some bizarre weather and it happened to be 80 degrees in early February. I realized that winter wouldn't be around much longer, so I opted for short sleeves. Fine by me, less fuss if I don't have to make a sleeve placket and cuffs! One of the things that drives me crazy about home sewing patterns (especially from the Big Four) is directions that include hand-sewing. There is no hand-sewing in mass-market production of clothing, so I know there must be a way to do it all by machine! Sometimes it seems the directions, especially for finishing, are purposely done so that the end product just screams homemade. So here are a few things I've learned for sewing professional looking shirts. If you want to learn some shirtmaking techniques, I recommend the book Shirtmaking by David Page Coffin. Especially for sewing the collar and cuffs, which employs the 'burrito method'. Nice crisp edges where everything lines up. The Sewaholic blog also has some great posts about sewing the collar and placket. 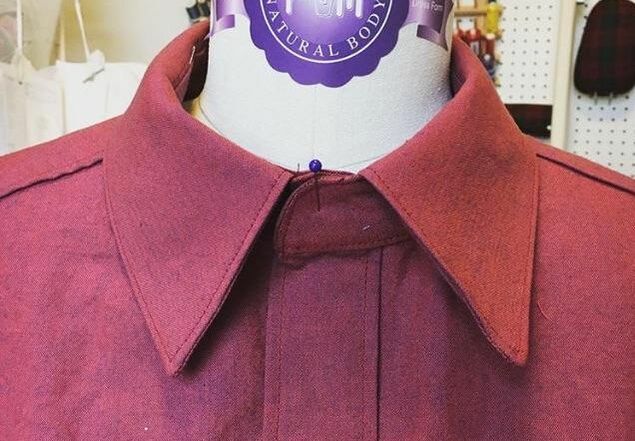 What else makes a good collar? Decent interfacing. And no, not the Pellon interfacing from Joann. I like to use Shirt Crisp from Fashion Sewing Supply. It's a bit expensive, but since I only use it in the collar and cuffs, a yard will last me quite awhile. The collar and cuffs end up so smooth, I love it! In the first sew shirts I made, I really struggled to get nice edges for my patch pockets. Then I saw a tip somewhere, I think it was the Colette sewing blog, to baste the pockets together, turn them RS out and press well. Then pull out the basting and you have nice crisp edges ready for sewing. 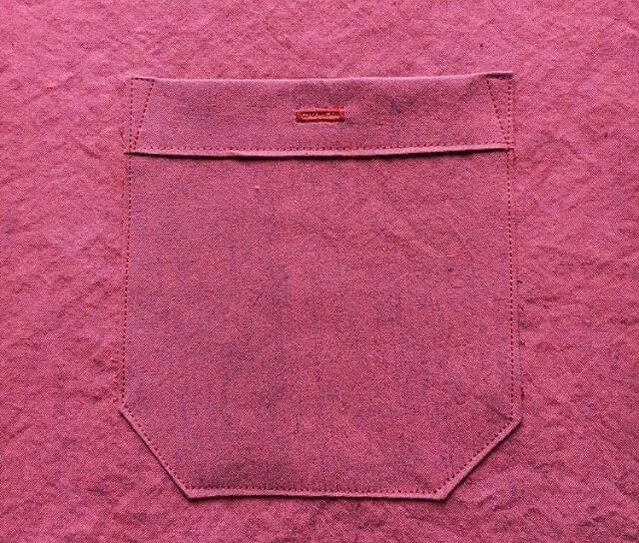 As you can see, my edgestitching still needs some work. Lots of edgestitching and/or topstitching is another thing you can do that will make your shirts look professional and not homemade. I spent some time examining the dress shirts in my husband's closet, and found that most of them had body and sleeve seams that were flat felled. I bought a flat felling foot for my machine on Amazon and figured out pretty quickly how to use it. Some people just use a regular presser foot and do some trimming, but I'd rather have the foot help me turn under the edge. While it works great for straight seams, setting in the sleeve was a bit challenging for me and I ended up with some puckers and ripples. 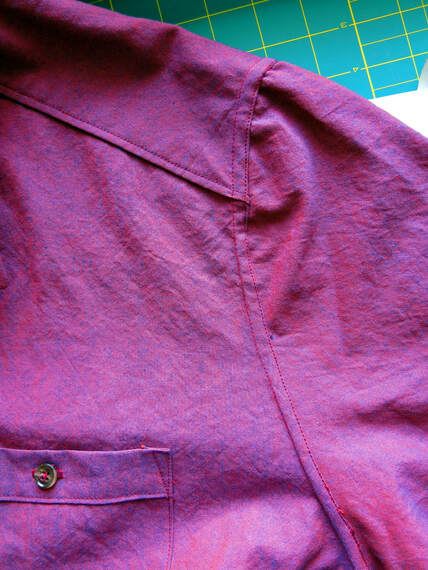 During the fitting process it seemed like a regular shirtsleeve with a wide and shallow cap just doesn't work well for him, so I was attempting to flat fell a pretty curved sleeve cap. I might have to alter my pattern a bit to reduce the curve just to make it easier to sew, or turn to french seams in the sleeve cap. 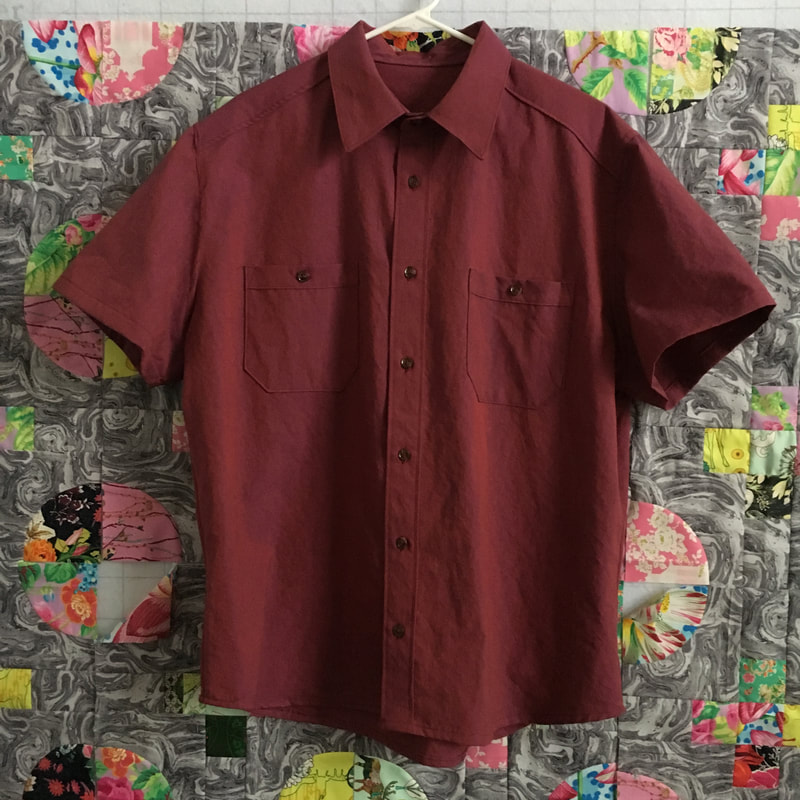 Overall I'm quite happy with how it turned out. My new Juki machine machine (an Excel F600) makes beautiful buttonholes, so there was no crying this time like there was on previous shirts, and there was no cursing and broken needles while topstitching through all the layers in the collar. 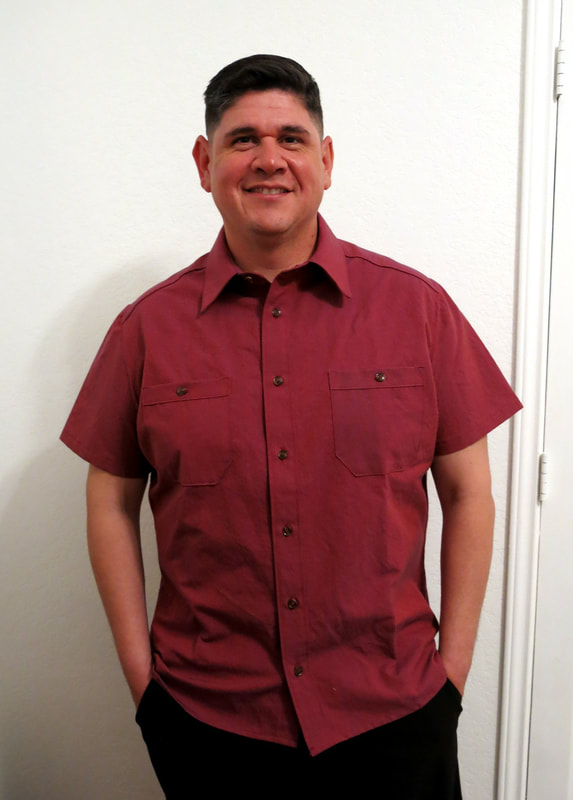 And, best of all, here is my happy customer. This big grin is why I sew.
3 Comments
It happened again. I watched my husband sigh and hang several shirts back on the rack at Kohls. "Not even close. They're all slim cut." I understood his disappointment. I don't even bother trying on dresses anymore, because I already know they won't fit me properly. After working in the fashion industry, I've come to learn that most RTW clothing doesn't fit me properly because my shape is different from the elusive 'standard measurements' and that is fine. I would say one of the main reasons I sew my own clothes is because I'm tired of store-bought clothes not fitting properly. Too tight in the waist, to narrow across the shoulders, a whole handful of fabric gaping open in the back waistband.
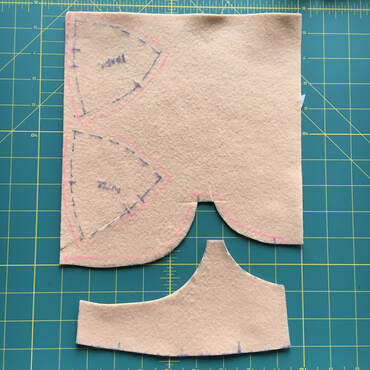
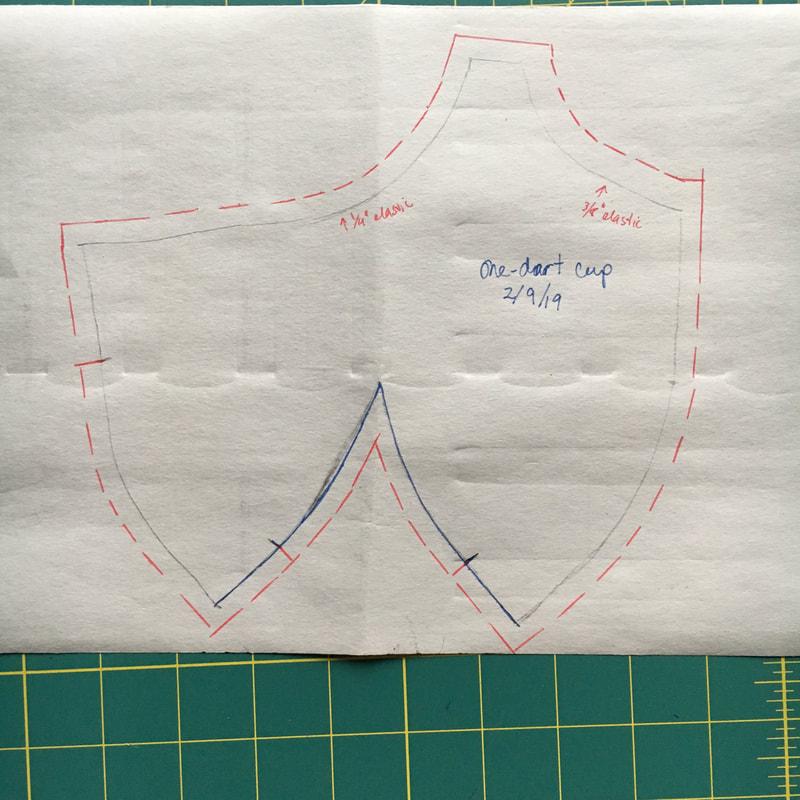
Still it is sad to watch someone you love feel the familiar pang of body image issues when they can't find clothes that fit. They think there is something more wrong with them, instead of the clothes. I've made my husband a few shirts over the years, but I became a little more determined about it when the 'slim cut' dress shirts became all you could find in department stores. For someone shaped rather like Gaston from the Beauty and the Beast cartoon, a big barrel chest just won't fit in a narrow shirt, and buying three sizes too big just results in baggy sleeves and a drooping collar. Last October I took my husbands measurements and began working on a sloper. The fitting process was a bit slow because there were a lot of fitting issues, and my husband was a very reluctant fit model. Every time I would mumble about too much fabric here, drag lines there, he'd feel embarrassed and blame it all on 'being fat'. Even though he has lost quite a bit of weight over the years to get healthy, he still doesn't see it in the mirror. No matter how much I assure him that, no, you are not fat and I love you exactly as you are, he still feels the same. There probably isn't much I can do to help that, other than continuing to be supportive and reassuring. Maybe most of us don't even really think about the emotional impact our clothes can have on us. I feel great when I wear something I've made that fits well and is in some bright and happy colors. But the opposite happens too; I can feel lousy when the pants that fit a few months ago won't even zip up, or I pop open a button on my shirt. Recently in the online sewing community there has been a lot of discussion on inclusiveness in pattern sizing. I read the comments with a lot of interest because I am in the planning stages of developing some patterns and pretty soon I will need to work on my sizing charts. Over the years I have heard all the usual arguments about why most patterns don't go past size 16, and I guess I never really thought about how disappointing it must be for people who, over and over, are left out of the size range. I recently sewed some panties from two different well-known designers, and when I was looking at the size charts I was shocked to see I needed to make the second-largest size. I wondered how many people had found these patterns and started to get excited about making them, only to realize that it wasn't available in their size. As a designer it would be easier for me to have just one block and grade a few sizes up and down and call it a day, but is that really beneficial for the sewing community? Do we need yet another sewing pattern only in sizes 2-16? I sew because I want clothes that fit correctly, which I'm sure is one of the main reasons many of us sew. But what would I do as a sewist, if there just weren't many options in my size? I decided I'm going to develop as broad of a size range as I can manage, because we all deserve to have options. We all deserve to have clothes that fit. It will cost me more, both in time and money, but I hope in the long run the effort will be worth it. I am hoping that you will join me on this journey, and help me develop the best patterns I can. All sewists are welcome here. All sizes, shapes and colors. I want this place (and my social media pages) to be positive, supportive places for all makers to share their creations and love of sewing. Happy Sewing A couple weeks before Valentine's Day, someone in the Bra Makers Group on Facebook mentioned quarter-cup bras and it got me thinking about barely-there bras more suitable for boudoir than everyday wear. Later on I came across this series on power bars by Silver Lining Atelier, and this bra in the photos. 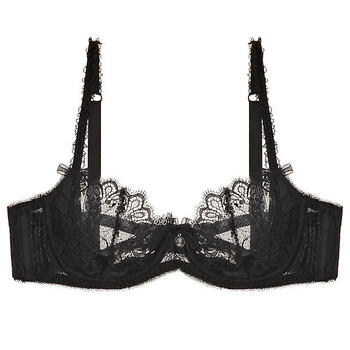 Photo from Silver Lining Atelier Thinking back to the discussion on quarter-cup bras and my interest in trying out an internal power bar, I decided to try making my own version of this bra. My self-drafted bra has a horizontal cross-cup seam, so in order to make the scallop edge of the lace across the top edge, I needed to draft a one-dart cup. In Beverly Johnson's bra-making classes on Bluprint (formerly Craftsy) she uses bra foam to sew up a cup, then draw the new seamlines and cut it apart to form the new pattern pieces. I only have a small amount of bra foam, and I didn't want to use it up so I wondered what else I had on had to use as a substitute.
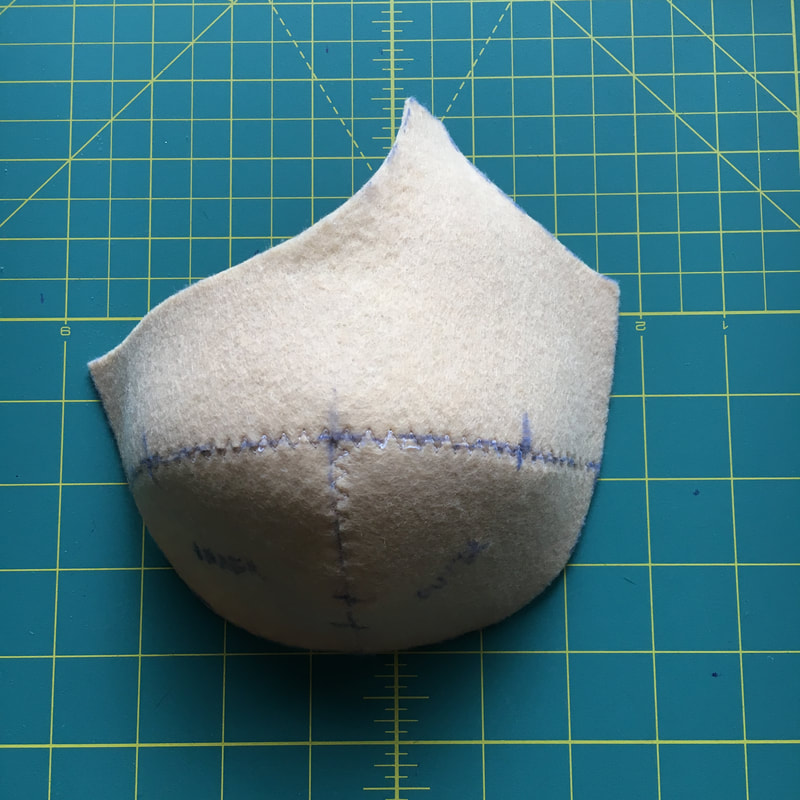
Felt! I had lots leftover from making Christmas stockings. After trimming off the seam allowances, I used a 3-step zigzag to sew the cup pieces together.
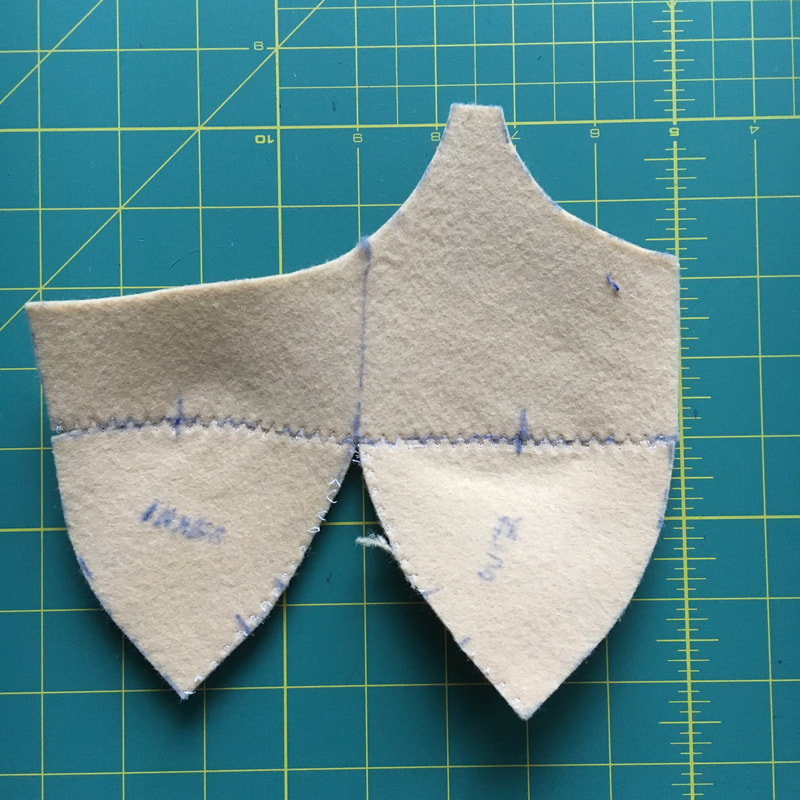
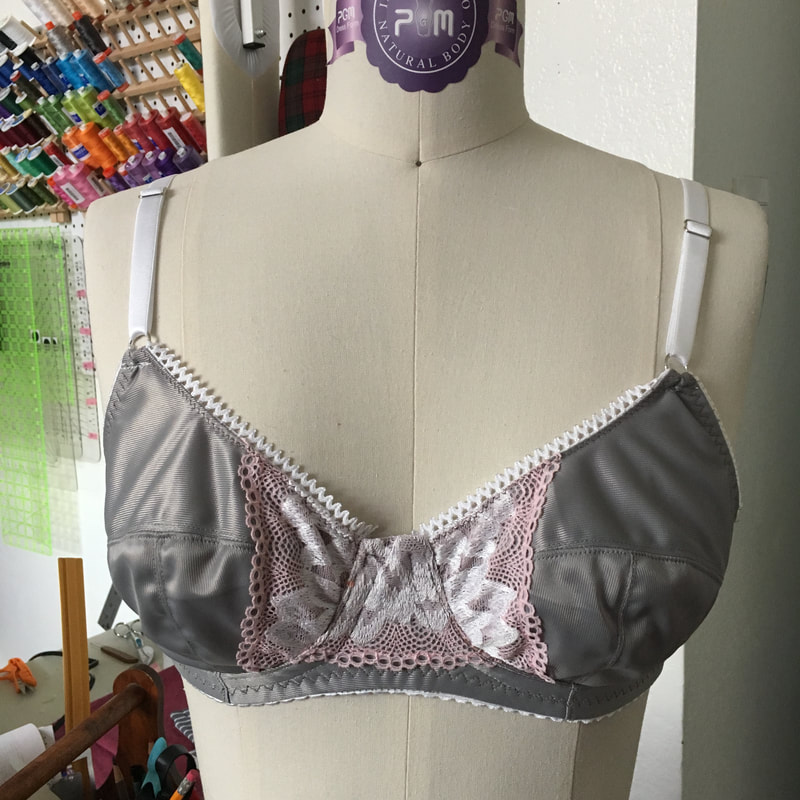
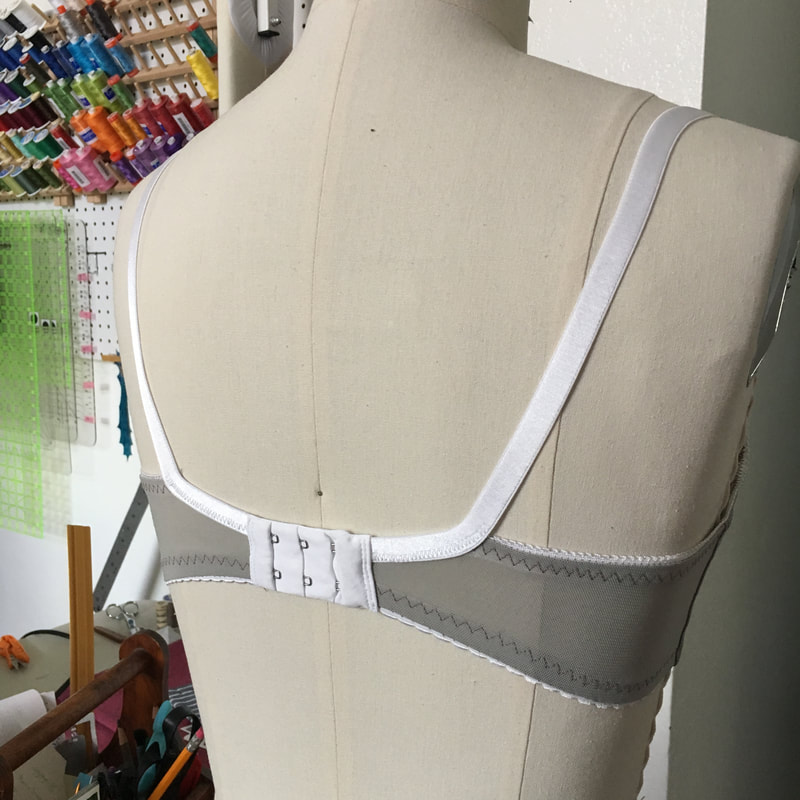
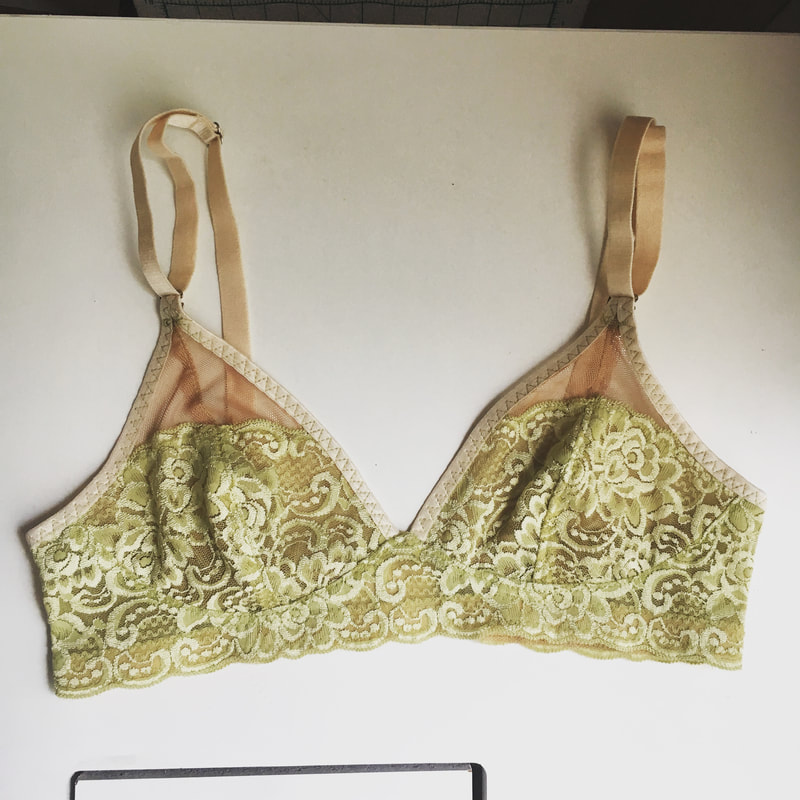
After sewing the cup, I realized that the dart would be right where the lower cup seam was, so I just cut open where I sewed. Seems a bit counterproductive, and there is probably a more accurate way of doing it with the paper pattern. I'm sure I'll learn someday! So to make the balconette cup, I cut off the cup about 3/4" above the end of the dart. I should have checked the measurement of the top of the cup, but I didn't and it ended up being too big. I unpicked some of the sewing on the narrow elastic and shortened it to create more tension across the top of the cup. Still not a snug fit, but this bra is more for show than function. 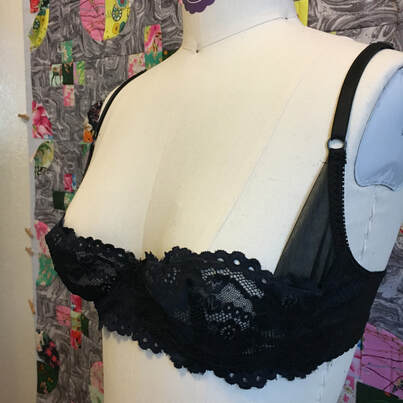 While the fit isn't perfect, I'm quite happy with how the overall design turned out. The power bar does it's job and directs the breast tissue toward the center. 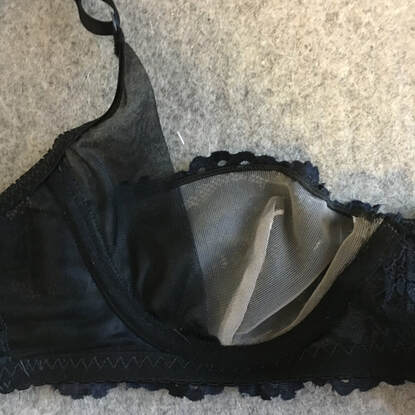 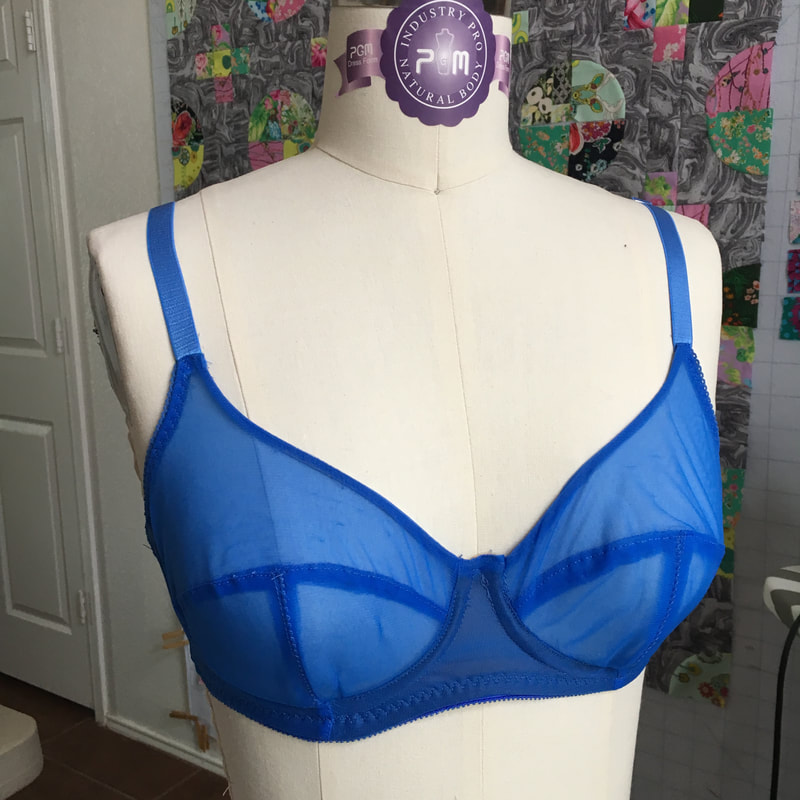  This is the second bra made from my self-drafted bra pattern. My first bra from this pattern had a few issues, mainly fabric bunching up at the side of the band and not enough room for the wires. I changed the angle of the frame/band to go more downwards, and raised the underarm edge to provide more coverage and leave some room for wire play. The fabric is a 15 denier nylon sheer from Sew Sassy. Elastics are from Lace Heaven. I used two layers for the cups, cut with opposing stretch and sewn separately. After I finished sewing both layers of cups I realized it would have been better to sandwich the layers so I wouldn't have to worry about the seam allowances overlapping perfectly. To finish the neckline, I sewed bother layers of the cups together, then sewed 1/8" elastic in the seam allowance. Clear elastic and I do not get along, so 1/8" elastic is the best I can do. To prevent the cross cup seams from drifting apart, I lined up all the seams used a narrow zigzag over the lower cup seam. We'll just call that a 'design feature'. Funny story about the cradle lining; I only have white and black, and since this fabric is so sheer I wanted a nude color. So I thought since I had some brown Rit Dyemore, I'd just do a quick dunk in a dyebath. Well, I added too much dye and the fabric very quickly became a chocolate brown. Oops! 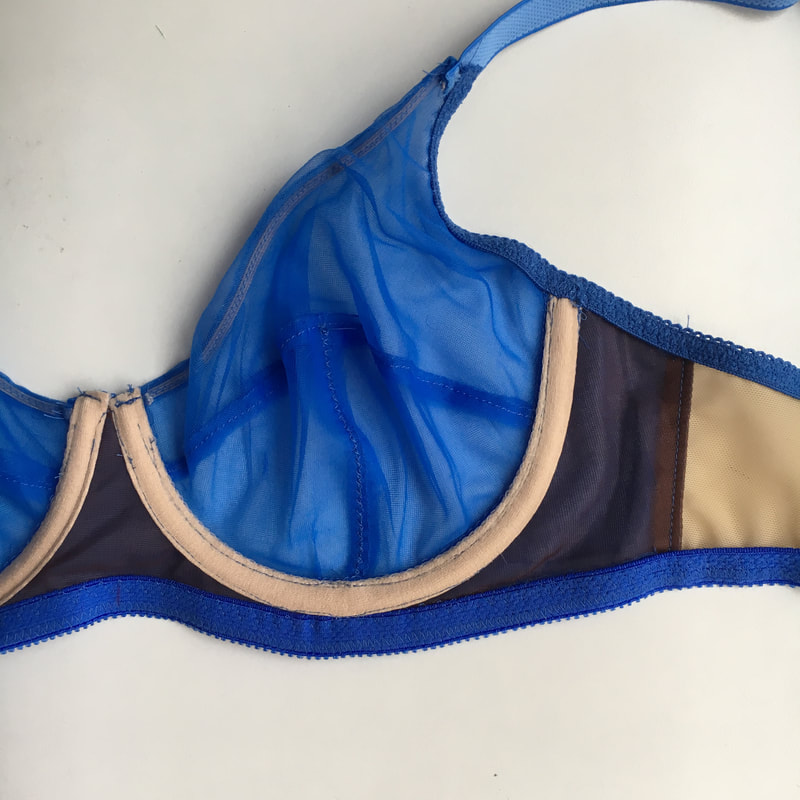 I used a different method of strap attachment and it was much less stressful, and I didn't break any needles. Before sewing on the underarm elastic, I lined up the edge of the strap with the neckline edge and sewed them RS together. Then when I went to sew the underarm elastic I made the edge as close as possible to the strap, so that when the elastic flipped back it would lay nice and smooth.
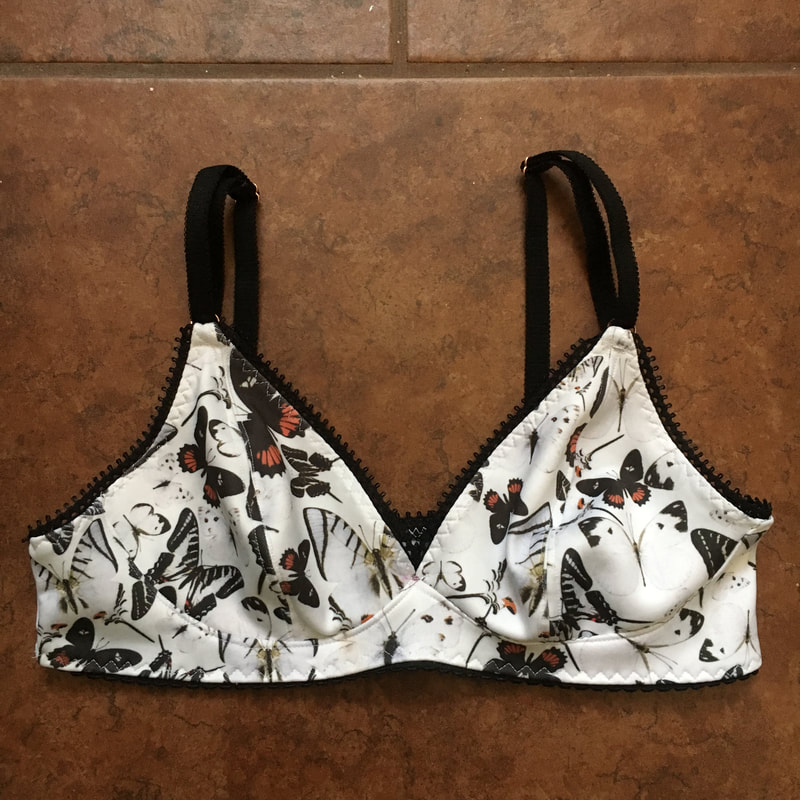
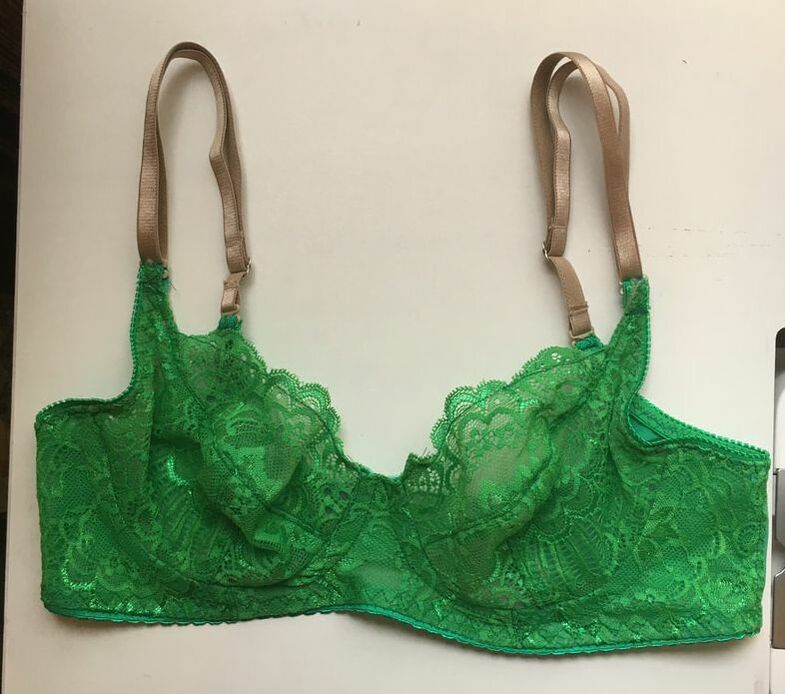
I'm quite happy with how this bra turned out. There is still a bit of bunching at the sides, so I'll work on that more. The wires also still don't have a lot of room to move around, so I'll check my pattern against the wire to see if the error is in the pattern or my sewing. As I mentioned in my previous post, I have dived down the rabbit hole of drafting my own bra patterns. While I really love my Harriet bras, after wearing them for awhile the wires start to poke me at the sides of my breasts and leave bruises. I wondered why an otherwise well-fitting bra would do this, so I did a bit of research and began to learn about breast shape and the different underwires available to fit them. Just as overall bodies come in various shapes and sizes, so do breasts. This blog post from LilypaDesigns was really helpful in learning about shapes and distribution of fullness, and Emerald Erin's guide on underwire styles was very interesting. I found I am wide set, with wide roots and bottom fullness. While I could try out various patterns from other people and fiddle with the fit, my stubborn determination kicked in and I decided to just make the pattern myself. Enter my new favorite book: Patternmaking for Underwear Design by Dr. Kristin Shin. This book covers all sorts of lingerie design, not just bras. It reads much like my patternmaking textbooks from college; the draft is shown in a standard size (34B) and it is up to you to implement your own measurements. There is no handholding at all, so if you are unfamiliar with patternmaking it might be a challenge. It all begins with fitting the underwire. Some blogs I read recommended ordering wires in different sizes and seeing which one worked best. This seemed a bit willy nilly to me, and since I already have several sets of wires that were too narrow I didn't want any more. I wondered if I actually needed a completely different style of wire. Luckily, I read about making a breast root trace. You can read about it here, just be warned that there are photos of a somewhat naked breast. I don't have a flexible ruler, so I used some jewelry-making wire doubled up. In the photo below you can see my root trace compared with the size 38 underwire which seems to fit me perfectly. 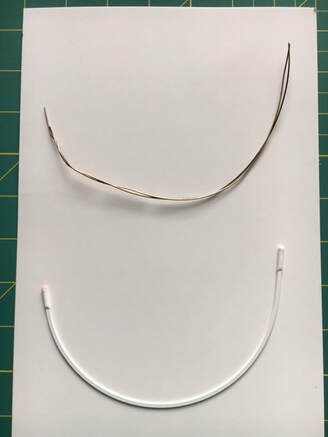 Now that I had a well-fitting underwire, I began drafting my pattern. I took various measurements indicated in the book and did my best to follow the diagrams. The only thing that confused me was the angle between the cradle and band. The directions were rather vague, and this ended up causing some fit issues with both the bras that I have made from this pattern. 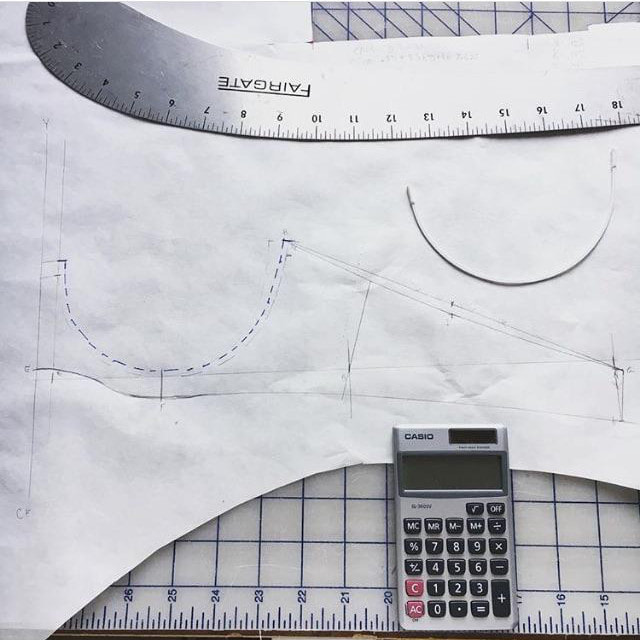 And now, here is my first bra made from my self-drafted pattern. 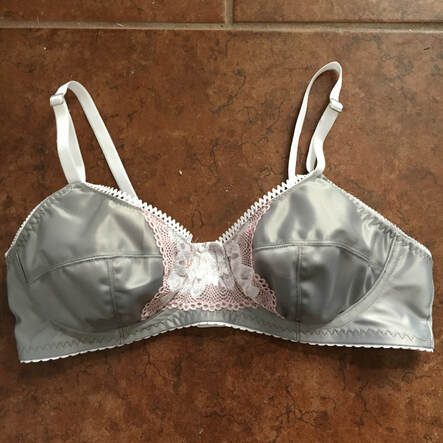 Go ahead and snicker at my funny looking lace butterfly. I had little bits of this lace leftover from a Harriet bra, but I ended up making the wings too small. Oh well. The outer cup and frame fabric is duoplex. There are actually no underwires in this bra, because they didn't fit into the casing! Somehow Dr. Shin forgot to accommodate for wire play, and there simply wasn't enough room to jam in the wires without them sticking out from the top of the bridge.
My dress form isn't quite as big as I am, so the bra isn't quite filled out. 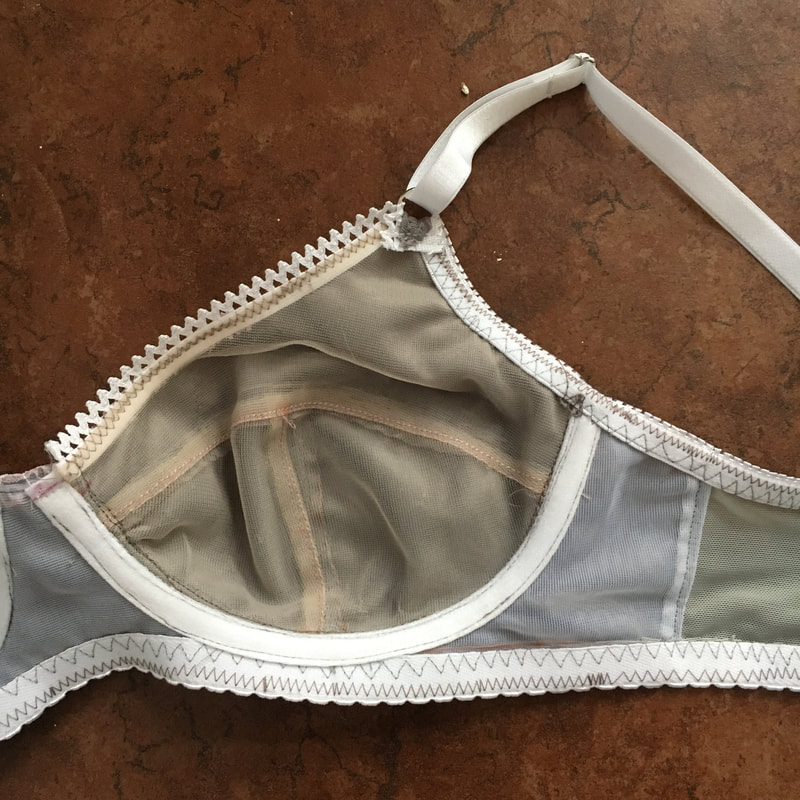 When I first started making bras I wondered what sort of finishing bra-makers did, so I like to share the guts of my bras so others can see. I line my bra cups with 15D tricot. As you can see, I was struggling with my feed dogs while sewing the elastics. My sewing machine is pretty new, and we are still getting acquainted.
So what did I change? Most importantly, adding in some wire play. That means raising up the top of the cradle/band seam 1/2" so the wire have room to move a bit and won't jam into my sides. I need more coverage in that area anyway, thanks to what I lovingly call my armpit fat. Remember how I said the instructions were a bit vague on the angle of the cradle/band seam? Well apparently I didn't make it angle down enough, and ended up with fabric bunching up on the sides. To fix this, I have angled the band down more at the top, adding about 3/8" at the top of the cradle down to 0 at the bottom. Also, I'm not a fan of sewing the O-rings at the top of the cup. I appreciate that it makes the straps easy to adjust, but all those layers usually make me break a needle. I'm trying out a different strap attachment next time. Have you tried to draft your own bra? Was it a successful fit? What resources were helpful? Why do I make my own bras? Because I want them to fit properly! I'm sure you've heard over and over that most women wear the wrong size bra. I spent most of my adult life wearing a 34B, and always had a problem with the band riding up and the straps falling off my shoulders. In addition to that, I felt like I just wasn't getting a lot of support. I got a bra fitting and was told yes, you are a 34B. So I decided that was just as good as it got and I just didn't have the right shape to fill in my bra properly and have cleavage of any sort. Fast forward to 2015 and I'm living in North Carolina. After spending my first 27 years in a hot and dry desert in California, living in a very humid subtropical environment is a big shock to me. Every time I left the house, the wet wall of hot air would make me feel drenched, and I'd have to change my clothes after coming home. The worst of it was my bras. I could literally wring the sweat out of them, and I really didn't enjoy feeling like I was wearing a damp sponge. So I went shopping to look for a plain cotton bra with no foam cups. But, guess what? Apparently, there was no such thing! I looked at every store I could think of, and it was all thick molded cup bras in synthetic fibers. I decided it was time to look into making my own bras. At that time, bra-making wasn't as popular so I it was difficult finding the right resources and patterns. I made a few bralettes in cotton jersey, which weren't supportive but at least I felt comfortable at home while wearing them. After I moved to central Texas, another hot and humid subtropical area, the Watson Bra by Cloth Habit became very popular. On social media it seemed like every sewist in the world was making them. Eventually I bought the pattern and made myself a few, and I finally found relief from spongy cups and got a decent fit and support.
When the Harriet Bra was released, I was in love. It was such a pretty design, and I had never had a lace bra. So I bought the pattern and carefully read the directions. When I measured myself to determine my size, I laughed out loud. 32D, yeah right! I had always thought of D-cups as big, and I definitely was not big. I ignored the sizing and made my first practice bra in 32C and... it was way too small. As in comically small. 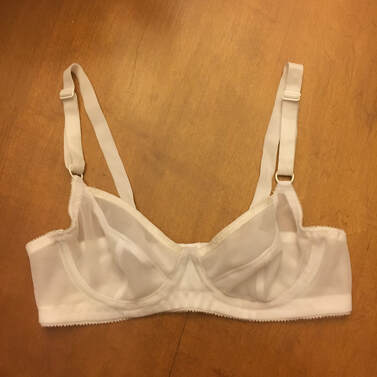 32C just wasn't going to work! Alright, I guess I should have made 32D. So I made another bra, and was suprised that the fit was better. Somehow I still thought I'd be swimming in it, but I filled out the cups nicely. I made two more Harriet Bras, tweaking the fit each time. For the first time, I felt very supported and lifted. My clothes fit better, and I wasn't fiddling with the straps and pulling down the band.
While out shopping one day, I peeked at the bras (the dreaded foam cups) just to see if they had my size. No 32Ds in sight. So now that I know what size I should really be wearing, bra-making has become more of a necessity. I have recently jumped into drafting a bra pattern using my own measurements, which has been an adventure all on its own and will be a blog post for another day.
Do you make your own bras? If not, is there something about it you find intimidating? |

CassieI design lingerie sewing patterns for everyday comfort and feminine style in an inclusive size range. Fill up your underwear drawer with beautiful custom-made bras and panties in your favorite fabrics and trims, designed to fit your body. 


Categories
All
Archives
February 2024
|
 RSS Feed