
|
0 Comments
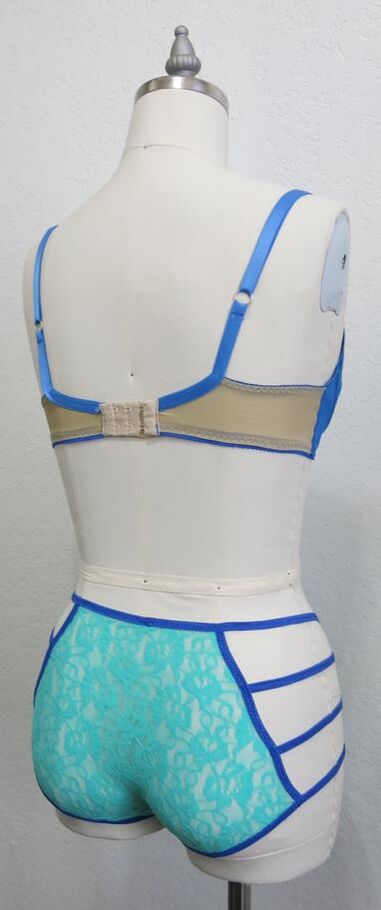
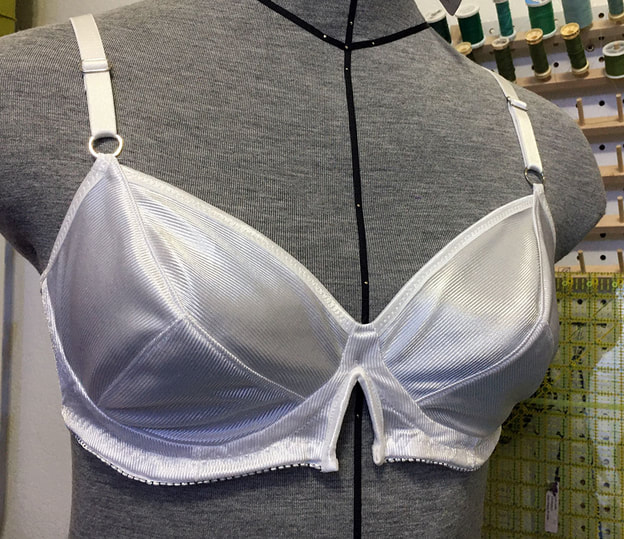 I made myself a bra and realized at the very end that the bridge wasn't wide enough at the bottom. Instead of tossing it (or torturing myself by being squished) I realized I could add more room to the width of the bridge. Separator wire to the rescue!
 One of the biggest rewards for me in creating lingerie patterns is helping sewists tweak patterns to get the perfect fit for their bodies. I think many of us turn to sewing our own clothes when we can't find what we want or need in the stores, and sewing at home can be a lonely and sometimes frustrating experience when our projects don't turn out right.
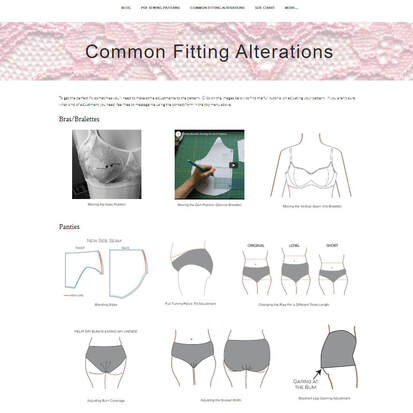
Over the last couple of years I have created quite a few blog posts for pattern alterations to get the perfect fit in bras/bralettes and panties. I have a blog category in my sidebar where you can find them all, but with so many now it is a bit cumbersome to scroll through them all. So, I have created a single page dedicated to the pattern alteration posts, and you can find what you need more easily. I hope these alterations are helpful for you to get the perfect fit. If there are any other pattern fitting topics for bras and panties you'd like to see, leave me a comment below. Until next time, Happy Sewing. Today I am going to share with you two ways to adjust the gusset length. There are two possible issues when it comes to gusset length, and each has a different solution. The gusset length can either be too short, and extra length is needed, or the gusset position on the body is incorrect (but the overall length is fine) and the position needs to be readjusted. Problem: The gusset length is too short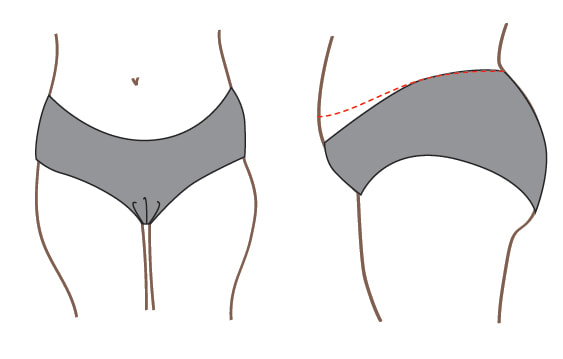
Bodies come in all shapes and sizes, and very rarely do we fit perfectly into a pattern straight away. Pattern designers create patterns with a measurement chart of "standard sizes", but each size chart will vary by company. You might fit perfectly into a single size, or you might find that your individual measurements span several sizes. In the tutorial below, I will share you with how to adjust your panty patterns when your waist and hip measurements fall between two different sizes.
Ahead of publishing my new lace boyshort pattern, I wanted to share with you a pattern alteration to help achieve the best fit in boyshorts. Do you ever find the back of the leg opening gaping at the bum? Perhaps you have a flatter bum or narrower hips than what the pattern is drafted for. Below is a simple pattern alteration to shorten the width of the leg opening to get a smoother fit. Problem: Gaping at the bum Symptoms:Excess fabric and looseness at the back leg opening Solution: Shorten the width of the leg openingDetermine the excess amount and divide by two. For this example, let's use 1" as the excess amount; divided in two and we have 1/2". On the pattern piece, bring in the inseam at the leg opening 1/2" on each side. You can see the new inseam and leg opening lines below drawn in red. Measure the new inseam length on each side to make sure the lengths match. Adjust if necessary.  If you are using a pattern with elastic or bands to finish the leg opening, you will need to shorten those lengths as well.
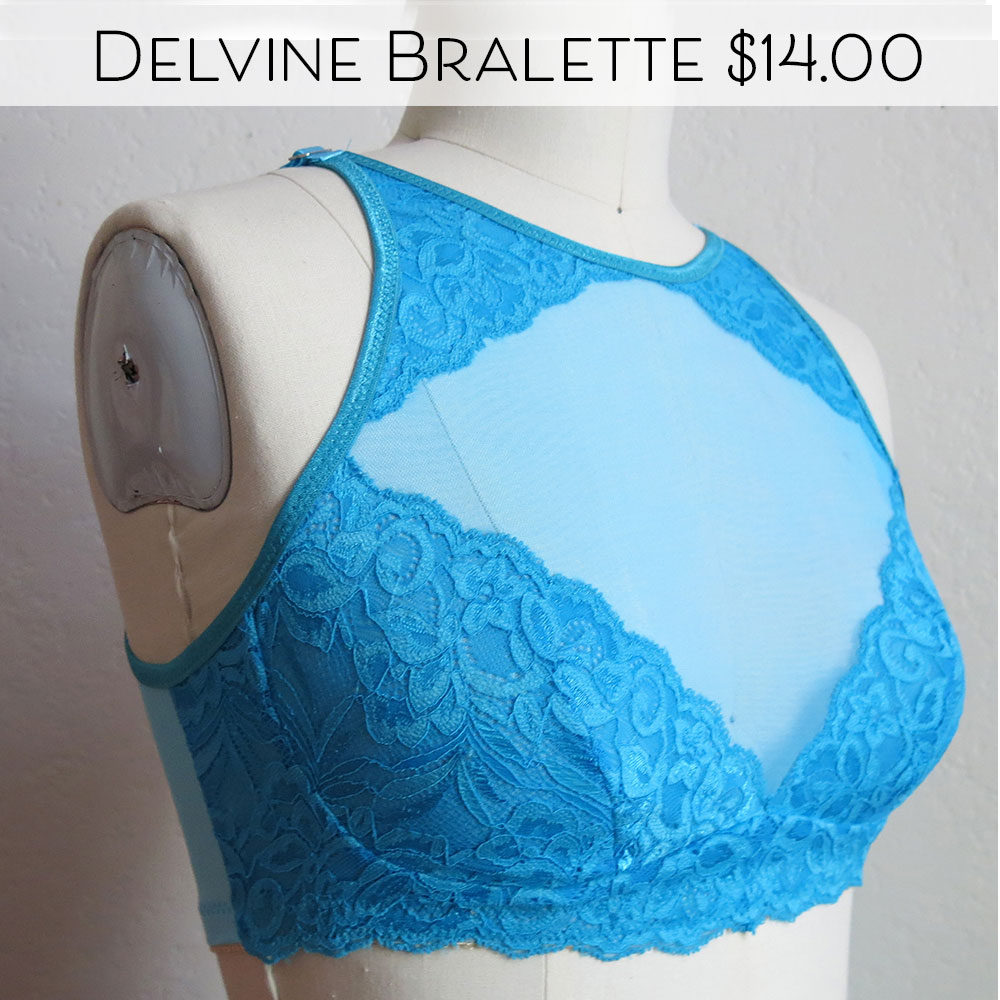
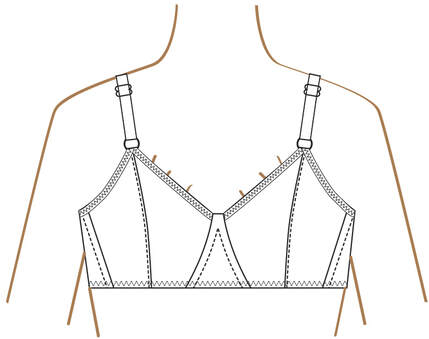
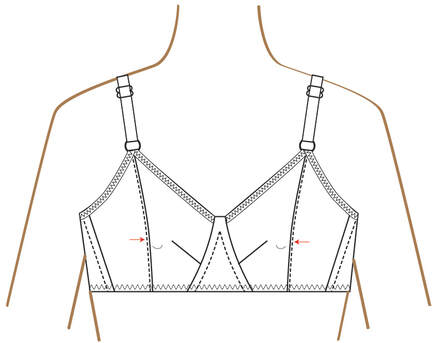
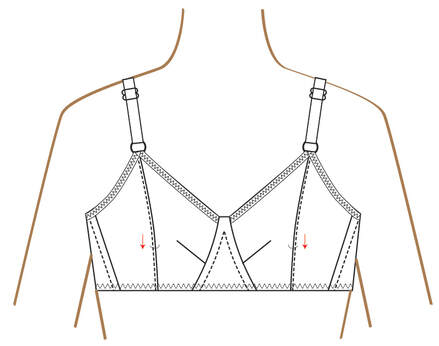
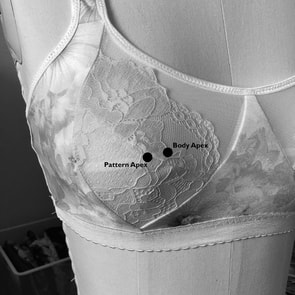
If you have any questions, or suggestions for other panty fitting tutorials, leave me a comment below. Until next time, Happy Sewing. 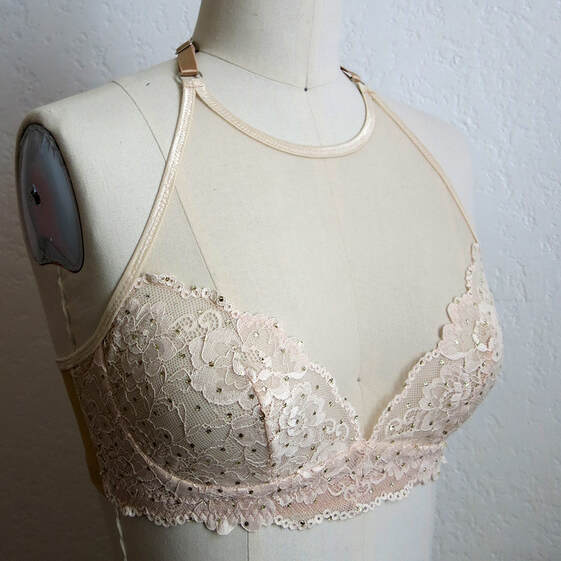 When I create patterns, I try to make them easy to customize not only for style but for fit as well. To get an optimal fit in the Delvine Bralette, it may be necessary to move the dart position so that it is aligned with the apex on the body. What is the apex?The apex is the fullest part of the bust, usually where the nipple lies. In the photo above, you can see that the dart aligns with the fullest part of the bust, and also aligns with the vertical seam on the dress form. Depending on your body shape, it may be necessary to alter the apex position on the pattern pieces. Video TutorialBelow is a video tutorial showing you how to determine your apex measurement and how to alter the pattern pieces. As I mention in the video, regardless of what front style you wish to use, you will need to begin with changing the pattern piece for Front A, D, E, F. Once you have changed it, you will need to copy the changes to Front B/C and any of the lace overlay pieces you wish to use. Other Dart QuestionsI have received a few other dart-related questions, so I will answer them here.
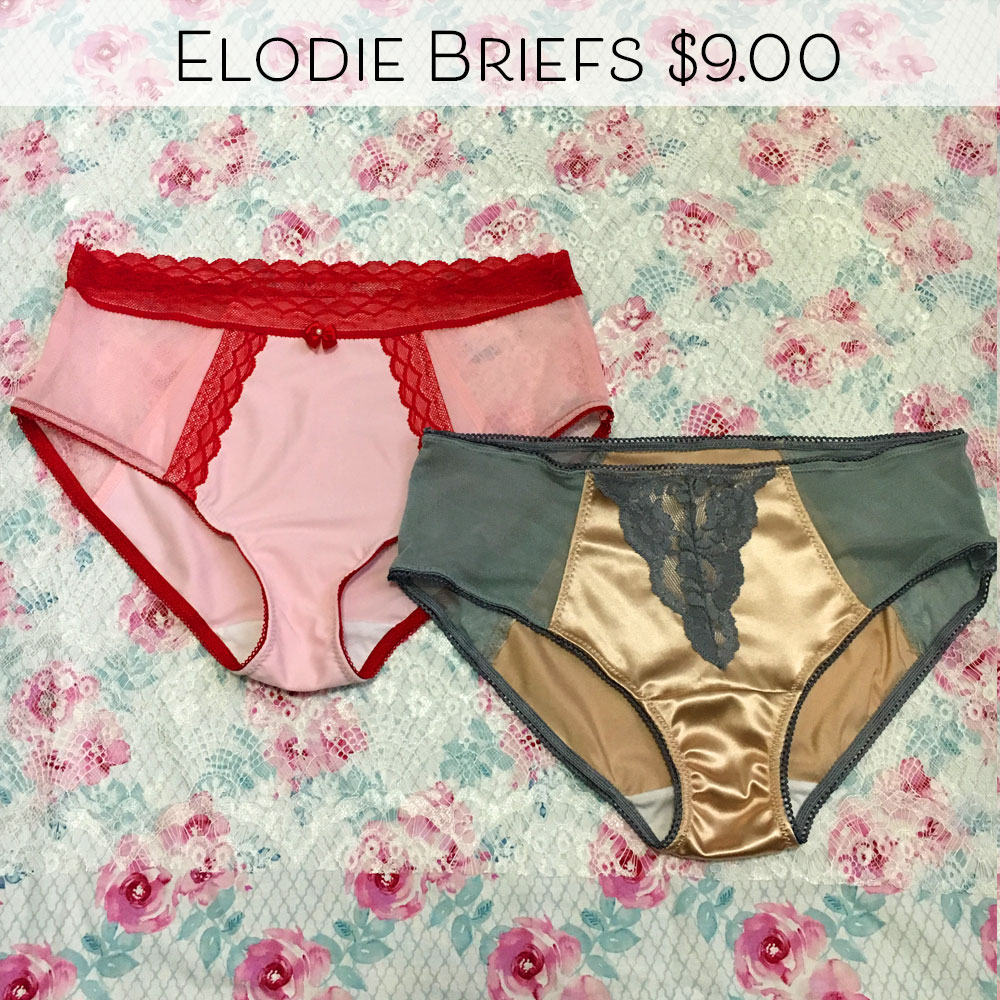
Why does the dart go past the apex? Usually when sewing tops and dresses, we want the dart to end 1"+ away from the apex point. If the dart ended directly at the apex, that would create pointiness in the bust, which is not very flattering. On my initial sample of the Delvine, I had the dart end directly at the apex point and the shape it created was pointy and not very pretty. But having the dart end above the apex point creates a nice rounded shape. Why are the dart legs curved? Again, when sewing tops and dresses, we usually see straight dart legs. Curved dart legs create a shape that contours more closely to the body, and in bra-making we definitely want a close fit! The curves in the dart legs create a rounded shape that contours to the roundness of the breast. How can I transfer the dart onto my fabric? When I made my samples, I used transfer marking paper and a tracing wheel. But one of my testers had a brilliant idea! She printed out an extra front piece and cut out the dart area, then used that to trace the dart. Do you have any other dart-related questions? Ask me in the comments section below. Until next time, Happy Sewing! When I design a pattern, I try to offer four style variations. Sometimes I'll have ideas for more variations, but, for a number of reasons, I can't include them all in the pattern. When I was working on the Elodie Briefs I had more ideas for lace overlays, which will be used for a new pattern in the future, and I also had an idea for a strappy option that uses elastic along the sides instead of the side panels. The pattern was already long enough, so I decided to offer the instructions here as a pattern hack. I hope you enjoy.
I’ve already covered pattern alterations for adjusting the rise for a different torso length, which affects both the front and back rise length. But what do we do when the back rise length is good, and the front rise dips too low? Problem: The back rise fits well, but the front rise dips too low  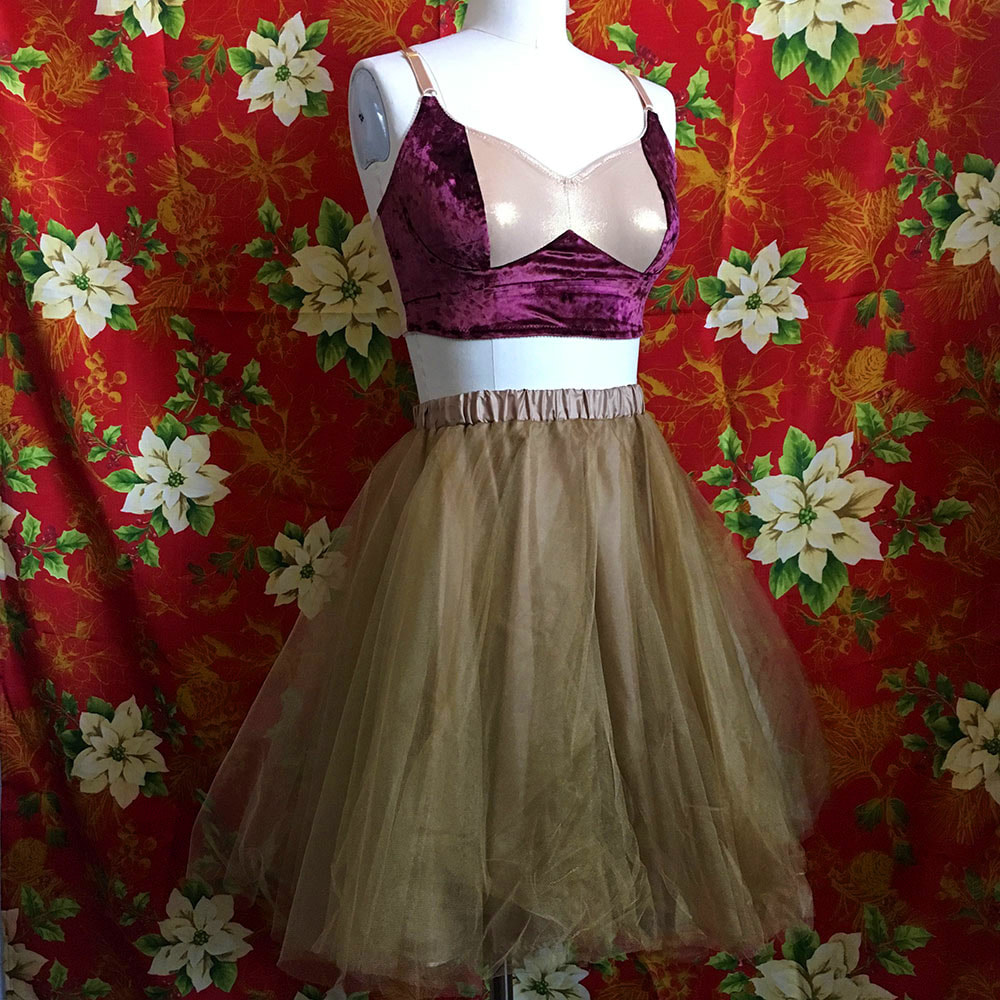 Christmas is almost here, and what a perfect time to use some of my luxurious and sparkly fabrics! Stretch panne velvet and gold stretch mesh are made up into a longline hack of my Iris Bralette pattern. This pattern hack is super easy, and creates such a pretty silhouette!
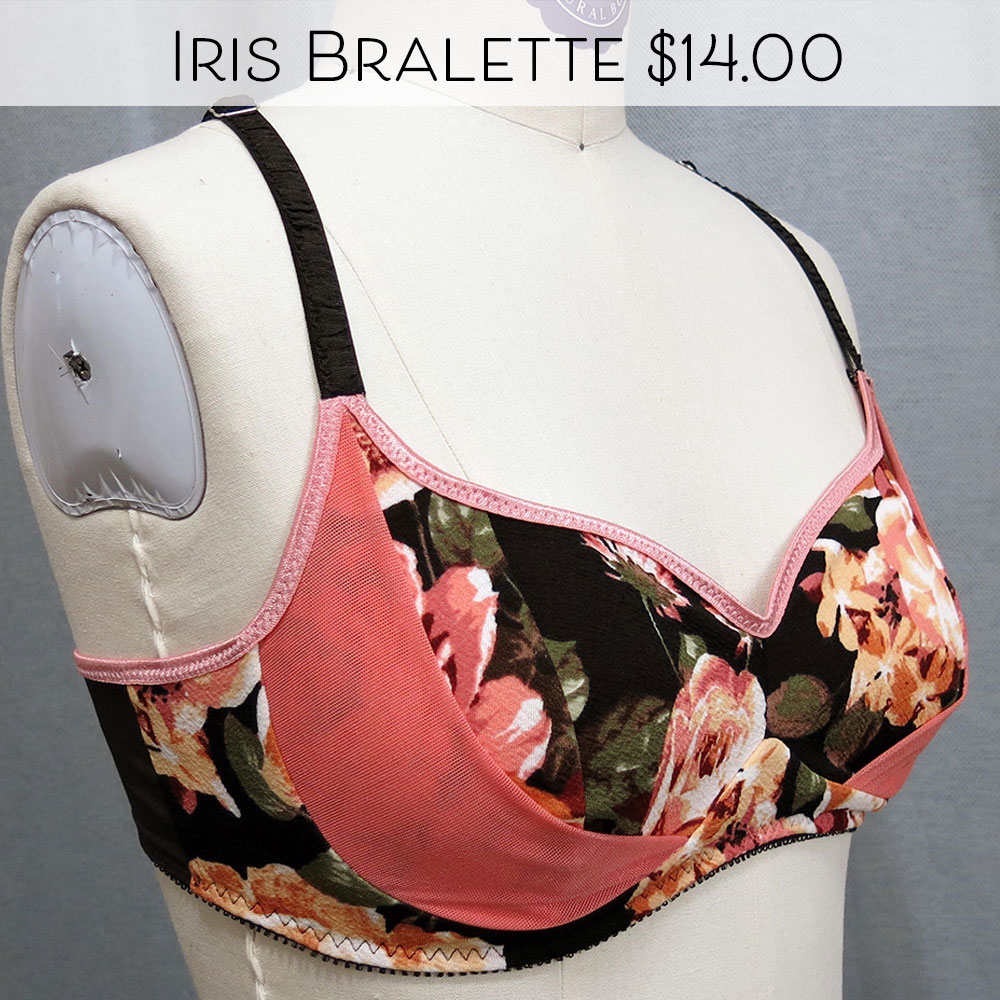
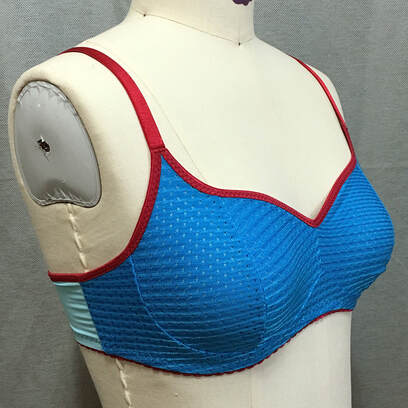 For the best fit on the Iris Bralette, you will want the vertical seam to fall in line with the apex. What is the apex?The apex is the fullest part of the bust, usually where the nipple lies. In the photo above, you can see that the vertical seam aligns with the fullest part of the bust, and also aligns with the vertical seam on the dress form.
Next up in my fitting and alteration series is changing the rise length. Wanting to change the rise length might be a personal preference, or it may be due to a difference in torso length. For this fitting/alteration exercise I'm going to assume that it is due to a different body shape than what the pattern was drafted for. During the testing phase of the Hellebore Hi-Cut, one of my testers said she was surprised by how very high cut the legs were, and her pair seemed to be much higher than the pictures indicated. After a bit of conversation, we determined that her crotch length was 2" shorter than the length indicated for her size. Let's use this same fitting problem here: Problem: The rise is too long, but waist and hip measurements are correct.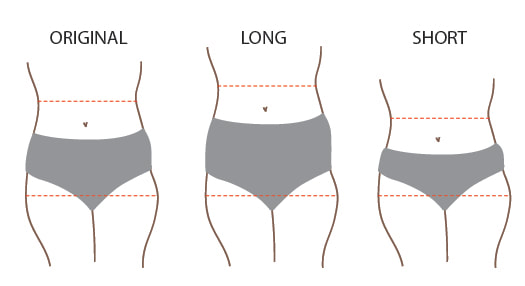 Next up in my panty fitting series is probably the most common problem I see; the back of the panty sliding into the bum and causing much discomfort. In American English we call it a wedgie. What causes it and how do we fix it? Let's take a look. Problem: The back of the panty is sliding into my bum Creating a test garment and fitting a pattern is pretty standard among sewists, because rarely do we fit into whatever standard measurements a designer uses. Ready-to-wear clothing is designed to fit a wide range of bodies, which is why it tends to have lots of ease and fabric that stretches whenever possible. But what about undergarments? Something that is worn so closely against the body needs to be fitted carefully, and I haven't seen too many resources for fitting panties. So here I am with a short series of fitting problems you might encounter while fitting your undies. Problem: The gusset is too wide Yesterday I finished sewing my second Barrett Bralette, a free pattern from Madalynne. Before I share my newest project with you, I wanted to share my first Barrett Bralette and how I altered the pattern to fit me. It seems like this sort of bralette only works well on small cup sizes, so when this pattern was published I was anxious to see how it worked on women with small rib cages and larger cup sizes. On Instagram I saw Barrett Bralettes on a wide variety of figures, and realized I had two options for altering the pattern to work for me. For reference, my underbust measurement is 31.5" and my full bust measurement is 37". I usually wear a 32D in my handmade bras. Options for altering the pattern: 1. Use a large cup size and pair it with a small band. 2. Use a small size appropriate to fit my underbust measurement and increase the projection. I decided to go for #2, since most of my fullness is in the lower cup, and I prefer not to have a lot of fabric in the upper cup going towards my armpit. According to the pattern directions my underbust measurement would have technically put me in an x-small, but I decided that would probably be too tight and cut a size small instead. At the apex (fullest part of the bust) I added 3/8"on both the center front and side cup pieces and gradually blended back to the size small. Why 3/8"? To be honest, it was just an educated guess and luckily it worked for me. 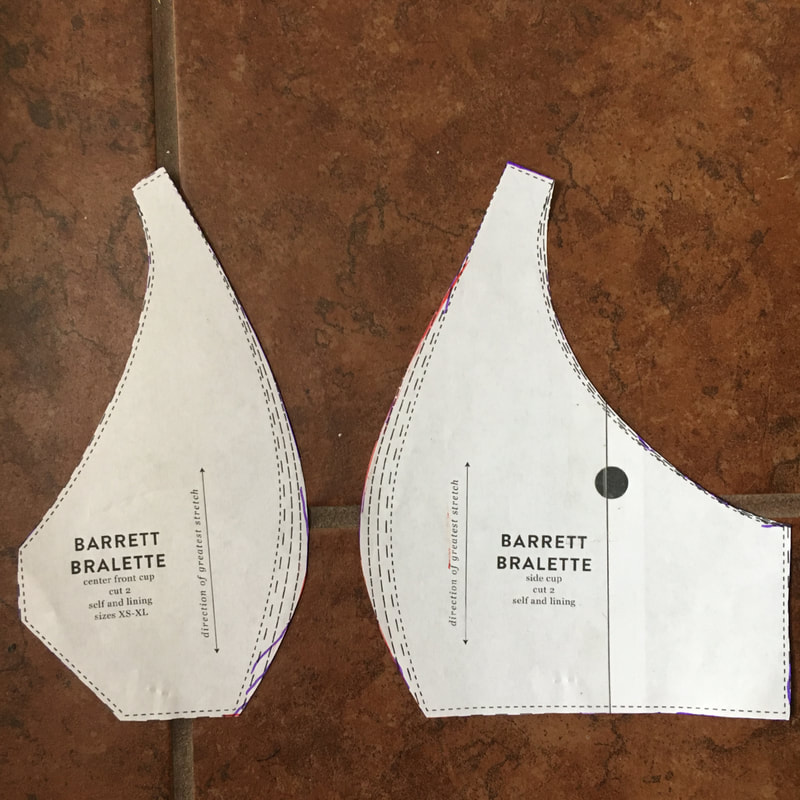 I cut my project from cotton/lycra jersey and lined it with stretch mesh. I planned to use this bralette as a sort of sports bra, but I don't do very vigorous exercise so a super supportive bra was not necessary for me.  One of the changes I decided to make was to use 1" elastic as both the straps and the entire back band. Why elastic only? Well, there's a story to tell and I'll get to that once I finish showing you my bralette. 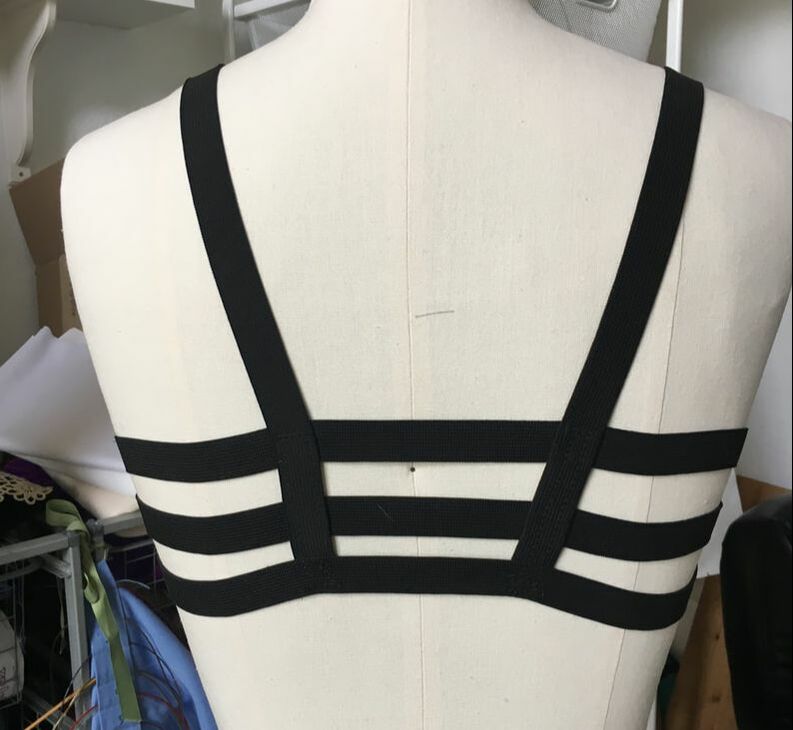 I used the back band pattern piece as a guide and cut three lengths of elastic. I basted them to the edge of the side cups, then topstitched down the entire seam. To secure the straps to the back elastics, I sewed a zigzag box over all the crossing points. 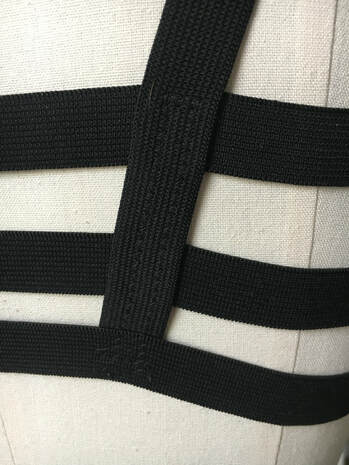 I'm quite happy with the fit and feel that it gives me a good amount of support for a bralette. I think using a strechy-but-firm knit fabric really helps to provide support, and so does adding a mesh lining. I like to show the guts of my bra makes, even if they are a bit messy. Please excuse any wonky stitching.  Now.. why did I use so much 1" wide black elastic? Because I have lots of it. Lots and lots of it. 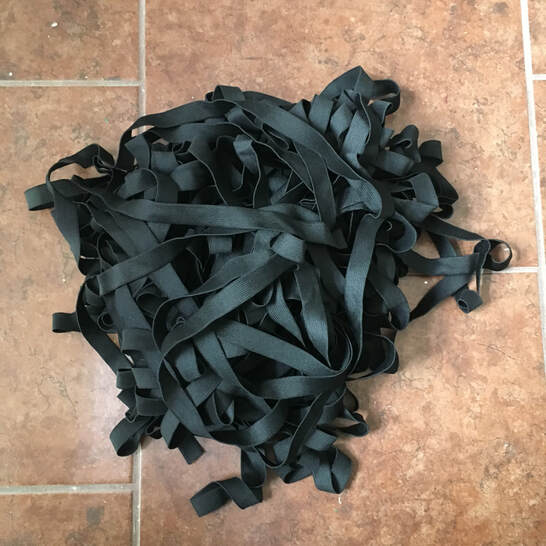 My husband spent all of 2016 stationed in South Korea, about 20 minutes from Seoul. He is a brave and adventurous type (and also has a degree in anthropology), so on his days off he'd hop on the subway, pick a random exit, and just explore the surrounding area. One day, he happened to stumble upon Dondaemun, Seoul's fabric market. Seven floors of fabric, trims, and commercial embroidery and sewing. He was amazed by all the vendors and wanted to get something for me. At that time I was beginning my bra-making journey, so I sent him swatches of the plush back elastics and straps that I was looking for. While I am blessed to have a husband that is eager to do nice things for me, he doesn't quite have the eye to pick out things that match the samples I give him. He found a vendor selling this black elastic and thought he had hit the jackpot. The vendor did not speak English, but through a few Korean words and gestures, Aaron thought he communicated that he would like five yards of elastic. The man nodded and began unrolling the elastic and measuring. And measuring and measuring, and unrolling and unrolling. Aaron became alarmed when the pile of elastic grew bigger and bigger and quickly looked up the Korean word for five (daseos) and waved his five fingers. The man nodded his head and just kept measuring. Aaron's friend said "Dude... I think you're getting that whole roll." Sure enough, that is what happened. The man shoved all the elastic into a grocery bag and wrote up the bill... which, translated into American dollars was a grand total of $15. Hah! Quite a good deal. While not plush back elastic, it is quite soft against the skin, and not overly firm like packaged elastic. So I am happy to use it in sports bras and waistbands. 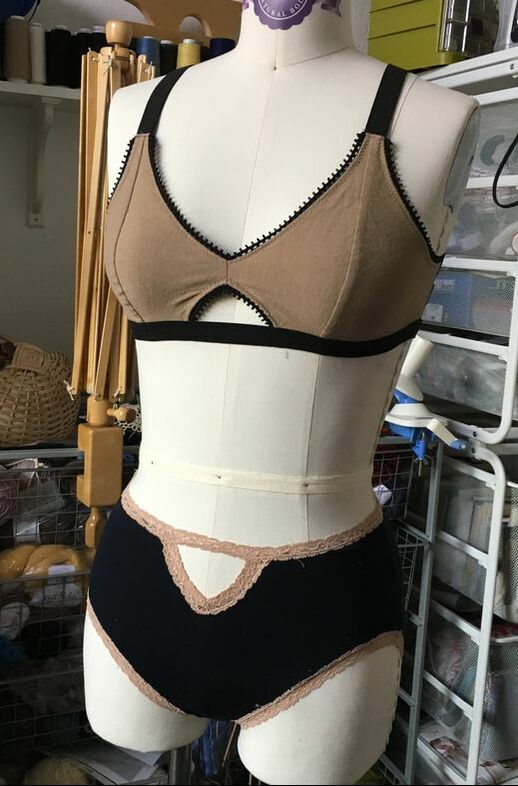 I put my bralette on my form to check the strap placement and realized that with my latest pair of briefs (from the pattern I am developing, stay tuned!) I had inadvertently created a matching set.
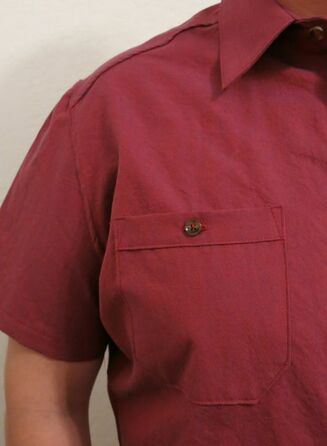
Have you tried the Barrett bralette? What do you think of the fit? Also, have you been to any of the amazing fabric markets around the world? Have you found any good fabric and trim deals? Remember the red shirt I made my husband for Valentine's Day? He loves it and has worn it several times, but there is a fit issue still bothering me.
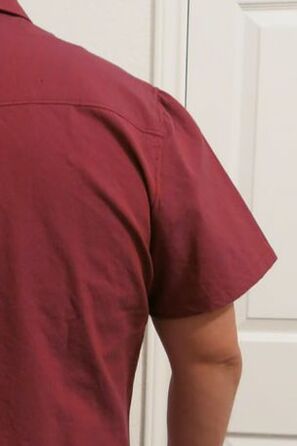
Diagonal wrinkles from the armhole up towards the neck. This is a common fit issue in RTW shirts for him as well. I searched through all my books on fitting, and all of them say the problem is sloping shoulders. Before I made this shirt, I had adjusted the shoulder slope several times and I really didn't think that was the problem. The typical shoulder slope adjustment is to lower the shoulder line at the armhole edge, and then lower the armhole by the same amount to preserve the armhole length. The wrinkles in this shirt were not loose; in fact they were quite tight on his body. Just to be sure the problem was not the shoulder slope, I followed the instructions in this video from Threads, and traced around my husband's neck and shoulders to check the slope against the pattern.  Spot on! So if that wasn't the problem, then what was? I continued to do more research on the internet, and came across a post in a sewing forum of someone having a similar problem in fitting a men's t-shirt. The issue? Atheltic build. More fabric is needed in the upper back and upper chest to accommodate muscles. So I traced off the pattern onto tissue paper, and drew lines across the upper chest and back. Beginning at the center, I cut them open, leaving a hinge at the armhole. I had my husband try them on carefully, and I let the tissue hang open. Sure enough, he needed about 1" on the front and 3/4" on the back for the tension in the tissue to be released. I don't have pictures of the fitting because he gets antsy and I need to work as quickly as possible. While I try to be professional (even with my spouse) during a fitting, I think he still feels I am negatively judging his shape and not the shape of the pattern. Something for me to work on, I think.  I had to re-draw the neckline, and also straighten the center back and center front seams. Time to work on a new muslin! These fitting issues are making me wonder if it would be worthwhile to develop a men's shirt pattern for athletic builds. The Sewcialists recently posted an interesting article on sewing for plus-size men. Sewing patterns for men already seem to be limited, and plus-size even more so. I already have a long queue of patterns I wish to develop, but I think I will add in a men's shirt for athletic builds in larger sizes.
Do you sew clothes for men? What sort of fit issues do you have? |

CassieI design lingerie sewing patterns for everyday comfort and feminine style in an inclusive size range. Fill up your underwear drawer with beautiful custom-made bras and panties in your favorite fabrics and trims, designed to fit your body. 


Categories
All
Archives
March 2024
|

 RSS Feed