
 When I talk about sewing my own bras and panties, one of the comments I hear most often is, “I can’t do that, I don’t have a serger!”
Well, I’m here to tell you that you don’t need a serger to sew knits! Is it nice to have a serger? Of course! But, if I can be honest, most of the time I don’t use a serger when sewing panties; the raw edges are usually (but not always) covered with elastic and only the side seams have exposed edges. Since I can sew a basic pair of panties in under half an hour, it doesn’t seem worth the trouble changing out the threads on my serger. So, if not a serger, do you need any special stitches? The answer is yes, and I’ll bet your machine has them! Below I’ll share the two essential stitches needed to sew your own bras and panties, and two other stitches that are nice to have.
0 Comments
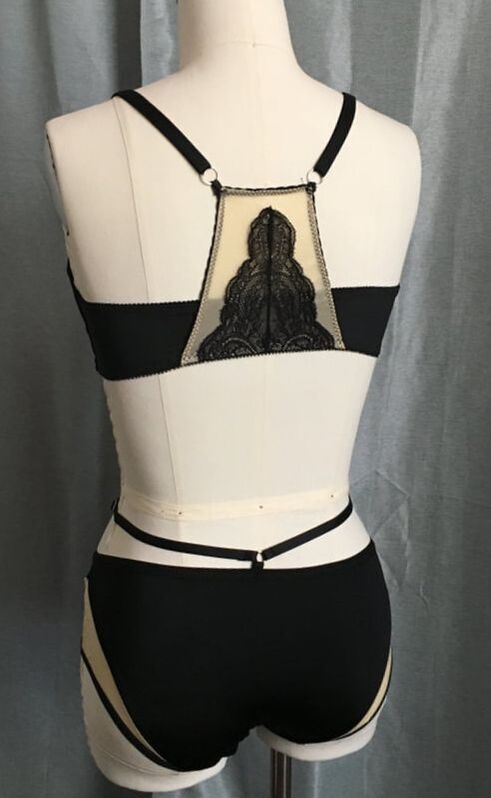
Happy New Year, sewing friends! A new year means lots of new things to come here. More patterns, tutorials and videos are coming your way. Is there something you'd like to see? Let me know by leaving a comment below, or filling out my contact form. Thanks! I’m starting a featured set of the week, with details on the patterns, fabrics and trims. To begin, here is Black & Tan:
 Have you ever used pattern weights? I hadn't heard of them until I worked in the fashion industry and saw the sample cutter using large cast iron pattern weights instead of pins to hold down the pattern pieces. It made sense in that instance, since patterns were printed on heavy paper and not flimsy tissue paper.
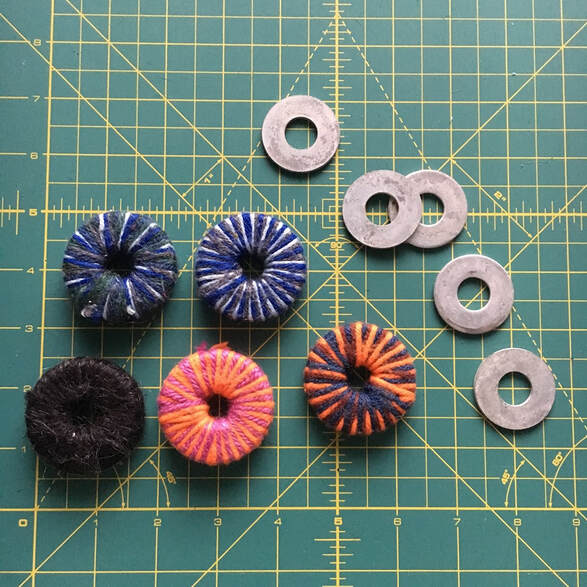
But are pattern weights good for home sewing use? I definitely think so. Supposedly they are more accurate than pins, because the fabric is not being distorted. I'm not the queen of accuracy, so I can't really say I noticed a huge difference in the accuracy of my cutting. But I did find them much faster to use than pins. Instead of spending lots of time adding in pins, I just plop down the weights in the corners and halfway down the seams, and I'm ready to cut. Pattern weights work best if you are using a rotary cutter. The sample cutter with the industrial pattern weights did use scissors, but I don't really know how he was able to cut right along the edge of the pattern pieces. You can buy Dritz pattern weights from Joann, but at $17 for 4 they are quite pricey. Four pattern weights wouldn't get you very far, so you would need at least two sets. Thankfully, I found how to make my own! I went to my local home improvement store and bought the largest washers I could find. I think they are about 1-3/4" wide. I stacked three on top of each other, then used scraps of yarn to wind around and around until all the washers were covered. If you don't have yarn, you can also use narrow strips of thin fabric, maybe leftover bias binding or selvedges. You want to cover up all the metal edges so that nothing will get snagged on the fabric. Easy, right? I have nine of these homemade pattern weights and I use them on every project. If you make a lot of bras, or anything with tiny pieces, you might wish to make a few smaller weights as well. I was given a set of the Dritz pattern weights, which are smaller than the ones I made, and I frequently end up using them when I cut out a bra project. Do you use pattern weights? Do you prefer them over pins? 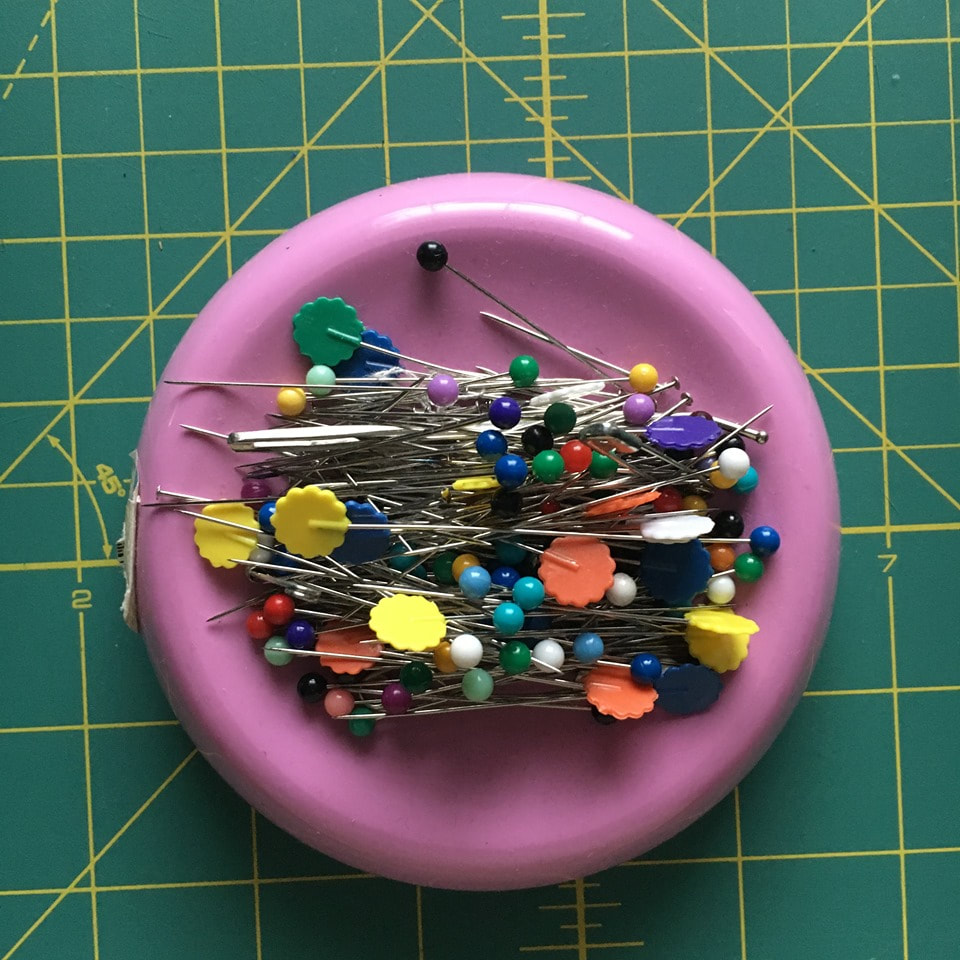 I'm sure many (if not most) sewists today have a magnetic pincushion just like the one pictured above. I've had this particular once for almost as long as I have been sewing. But one pincushion is never quite enough, is it? I don't know about you, but I pin at my cutting table, then carry the pieces over to another room with my sewing table. I usually forget to bring the pincushion with me, so I usually spend half my sewing time traipsing back and forth across my house. So, I decided to get another magnetic pincushion, only to find out that they are expensive! I believe at Joann right now they are around $15. Ridiculous! There must be a cheaper solution. Well, I can thank my husband for solving the problem. One day on a shopping trip, we stopped by Harbor Freight Tools. While he did his thing, I was wandering around and saw quite a few tools that are great for sewing! Here is what I found, a 4" magnetic bowl (same size as the pin cushion from Joann) but for $3! 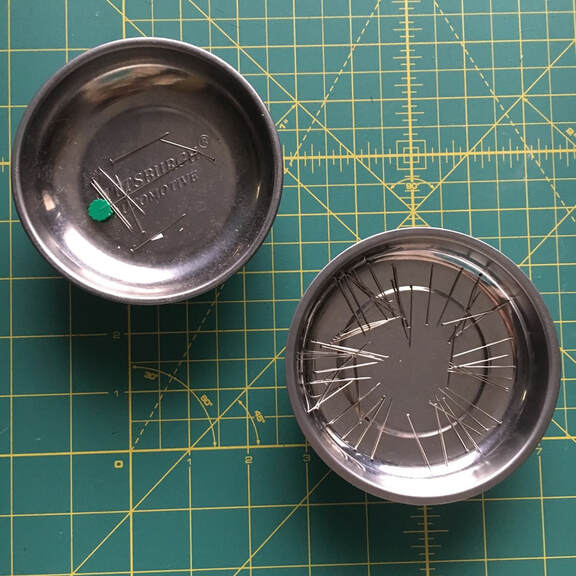 Now, of course it doesn't come in pretty colors, but if I have to choose between form and function, I'm definitely going to choose function! And at that price, I bought two so I have multiple pin cushions around my sewing areas. I also like to put the screws and throat plate on here when I clean my machine, so nothing gets lost. You do clean under your feed dogs, right? Right?... ok, maybe that's a blog post for another day.
Do you shop for sewing tools at the hardware store? I think we've all had bad experiences with the purple Dritz fabric marker with disappearing ink. So much time spent carefully marking all the important points on your pattern pieces, only to find them gone the next day. Or, you plan to use a purple fabric and the ink blends right in! What to do? Now, I can't take credit for this. I read it in some sewing forum, but I can't remember which one. The cheaper alternative: Crayola Washable Markers. 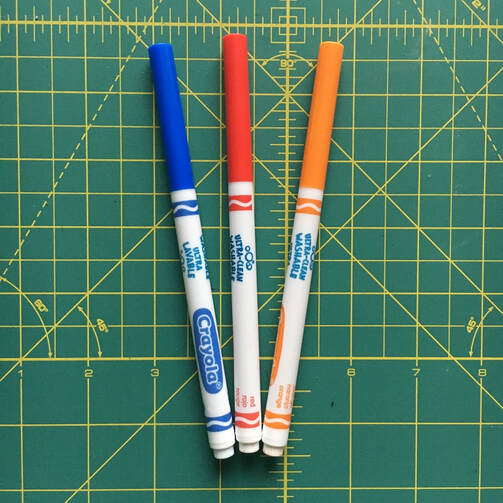 Yes, the same markers your kids use. For about the same price as one of the Dritz markers, you can get a whole pack of the fine tip Crayola markers. I have used all the colors, and in my personal experience I have not had a problem getting any of them to wash out. I even used the red marker on a quilt with a white background, and found that my water bottle leaked inside by bag. The red ink was smeared all around, and I was afraid it was going to stay that way. When the quilt was finished, I washed it as I usually would and all the ink came out! Of course, always do a test swatch, iron and wash it to make sure the ink will come out. 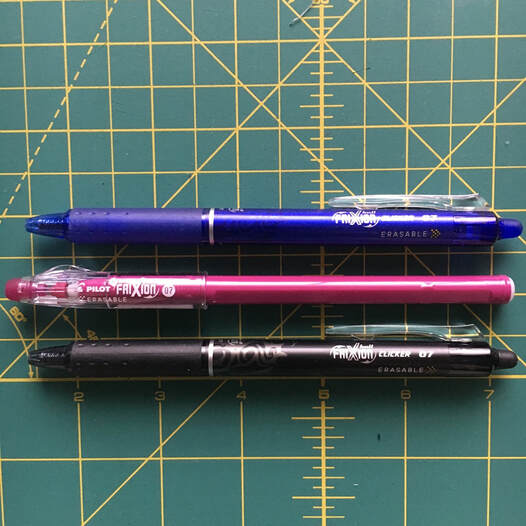 Another good marking option are the Pilot Frixion pens. I bought a 3-pack with red, blue and black, and someone gave me the pink pen. These make a very fine line, so they are good for very precise markings.
These markings disappear under heat, so once you iron over them they are gone. Well... not exactly gone... I read a story of a quilter who used one of these pens on her quilt top. The quilt was flown to a quilt show, and lo and behold the pen markings had returned!! How?? Apparently freezing temperatures brings them back, even after washing. So I would recommend using the frixion pens for markings that will be hidden in the finished garment, or just don't go into below freezing temperatures? And if you do accidentally erase your markings, try putting your fabric in the freezer--they might just come back! Do you have any unusual tools for marking?
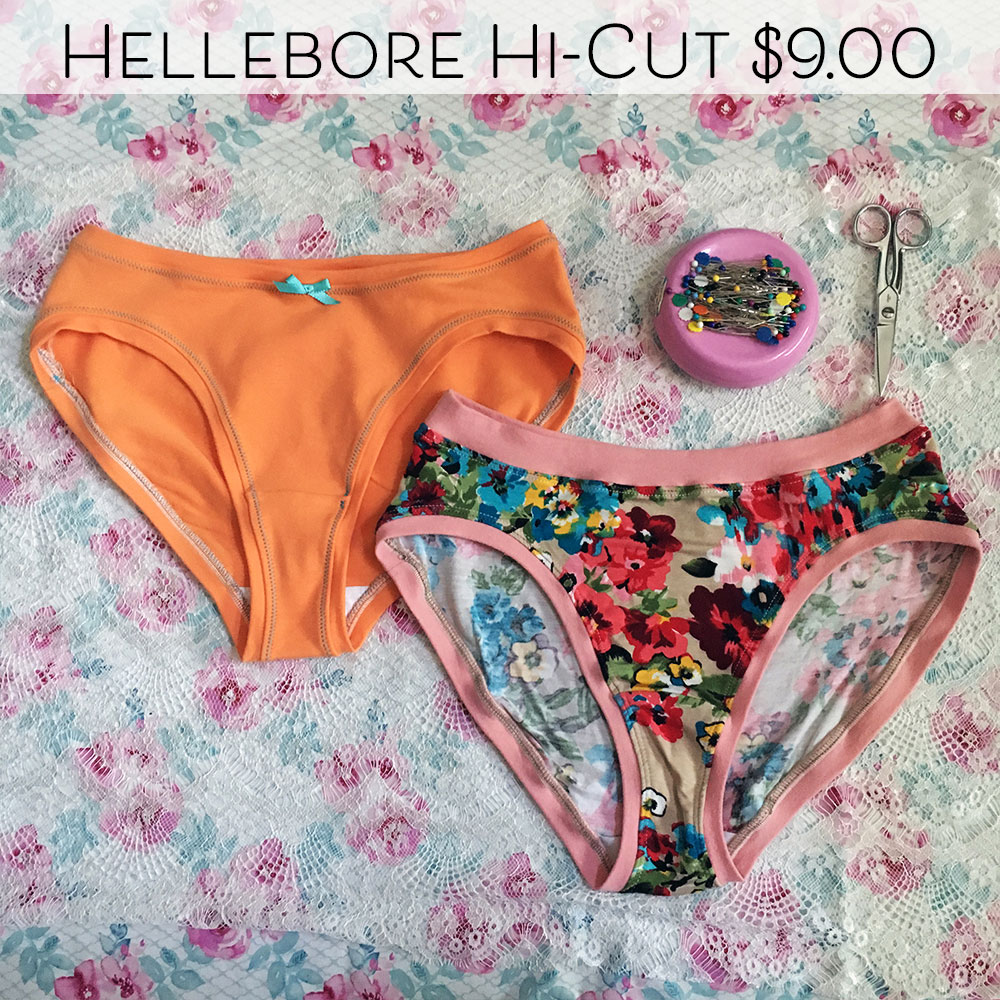
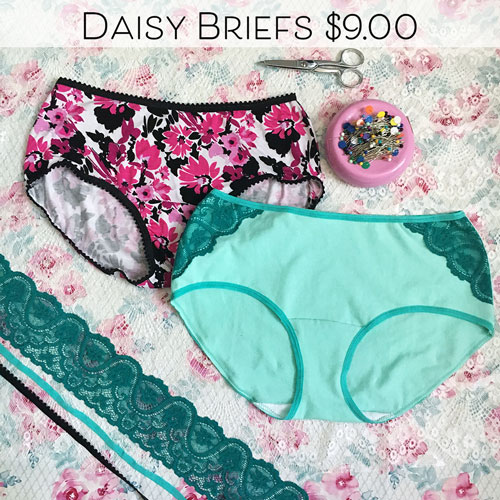
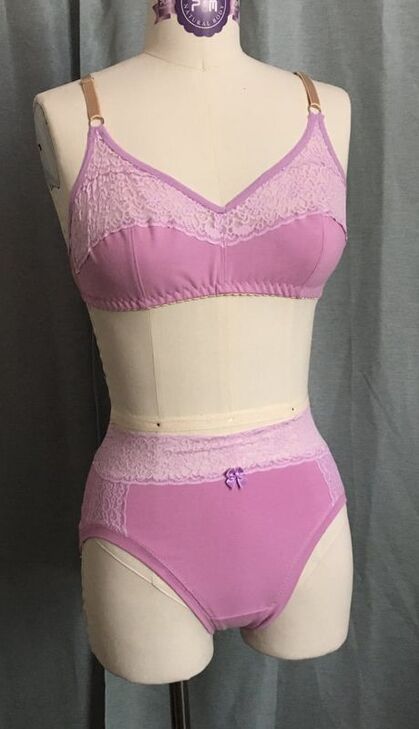
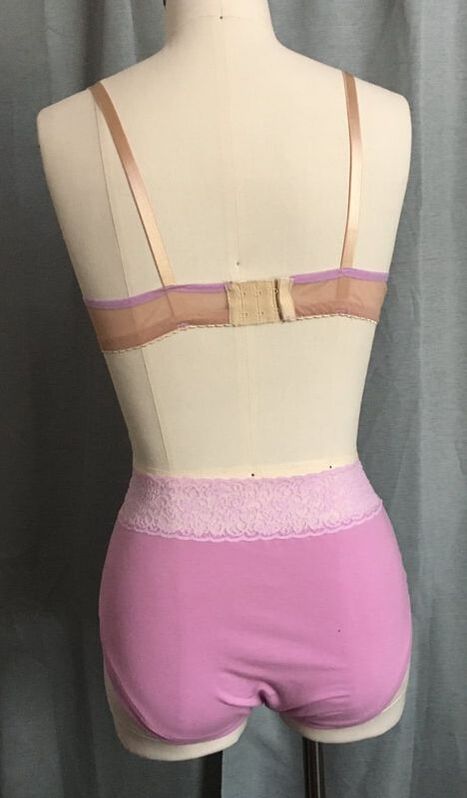
Awhile ago I made this set, and I forgot to share it! I thought of it again when I was writing my post about joining strips of lace. PatternsBralette: Bambi Bra by Ohhh Lulu Panties: Hellebore Hi-Cut This is my second time using the Bambi Bra. It is an interesting pattern because you can use knit or woven. I used bias charmeuse the first time and it turned out too big. The only measurements indicated on the size chart are the full bust measurements, and a note that Cup Size 1 is for A-B and Cup Size 2 is for C-D. I'm around a 32D, so I used Cup Size 2 and a size Small, but the band still felt quite big on me. The panties are one of my samples for my Hellebore Hi-Cut pattern. I enjoy making coordinating sets and wanted to use this pretty lavender lace again. Fabrics & TrimsMain fabric: Lavender heavy cotton-spandex jersey. I'm not sure of the weight or content because it came in a grab bag. Not terribly soft, but it has very good recovery, so it must have a high amount of spandex. Back band: beige powernet. The pattern doesn't actually say to use powernet for the band, but the first time I used this pattern it was too big, so I made the band smaller and definitely needed firmer fabric in the back. Lavender lace: 2" wide, two pieces joined together. Also from a grab bag. Elastic (upper edges): Lavender matte elastic. I love matte elastic for panties, but this is probably not the best choice for a bralette. Mostly I used it because it matched well. It is thin and soft, but not very firm. Band elastic: 1/2" beige scallop elastic  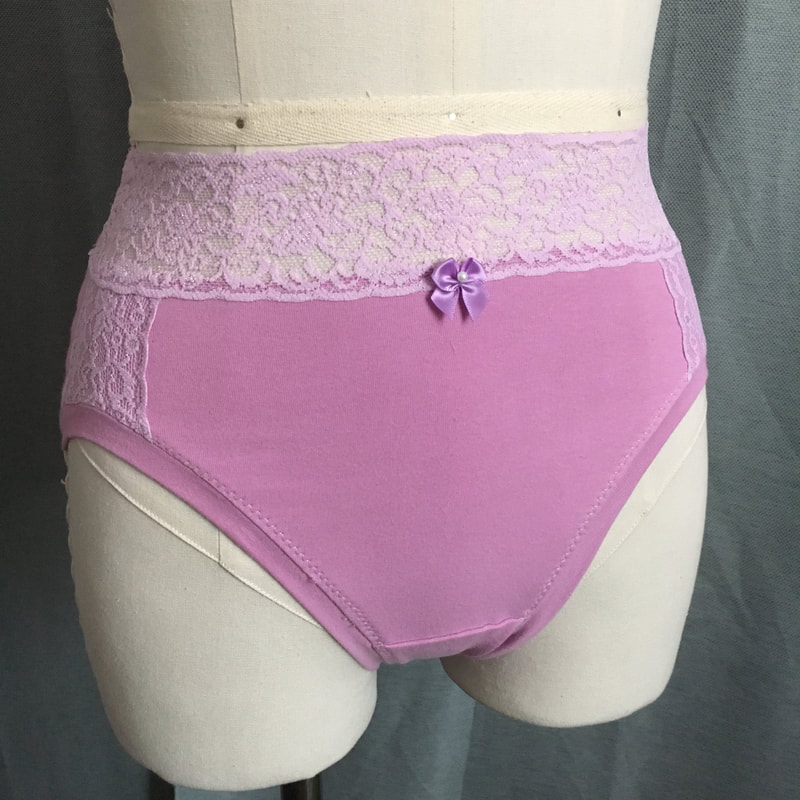 Do you ever find the perfect lace trim for a project only to find that it is too narrow? It has happened to me a few times now, and I wanted to share a trick with you. Using a zigzag stitch (and a bit of patience and slow sewing) you can join strips of lace together to make a wider lace. 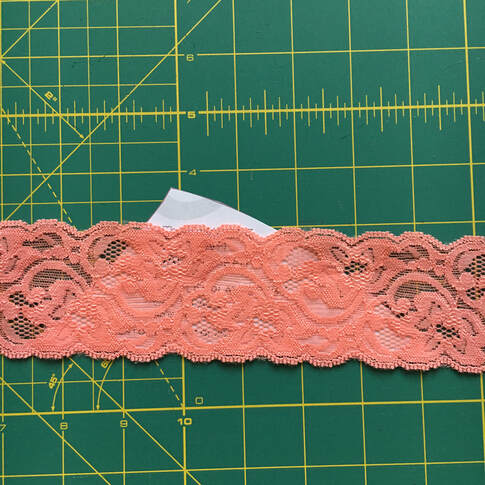 For my first Knicker November project, I wanted to make a pair of Daisy Briefs to match a new bralette. I have decided to combine both Style B & D, so I need some lace overlays for the sides. As you can see in the photo above, my lovely coral lace is just a bit too narrow for the pattern piece. 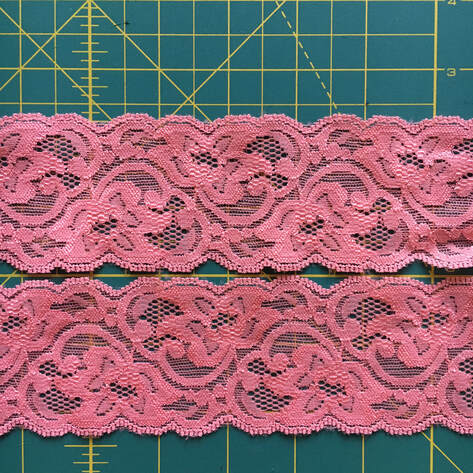 Here, I have laid two strips of lace side by side. With the scallops perfectly aligned, there are big gaps at the lowest points in the lace.  But if I offset the lace, with the big scallops over the lowest points, it fills in the gaps much better.  Slightly overlap the lace. I have it laying on my cutting mat, but you might want to do this while you are at your sewing machine. It is a bit difficult to pin the layers, so you won't want to move very far with the lace. 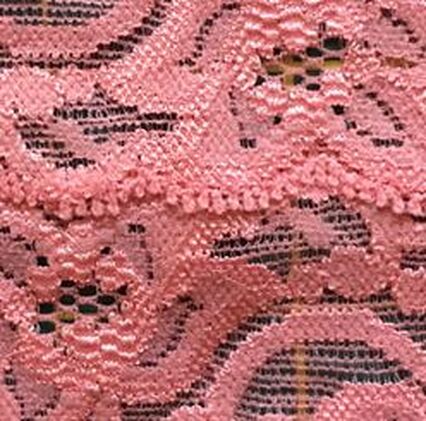 Use a medium width zigzag, centered over the overlap. Be careful not to stretch the lace while you are sewing, so that you don't get any ripples. In the photo above you can just barely see my stitching. A bit of steam from the iron will help the lace lay very flat; be careful not to have the temperature too high! 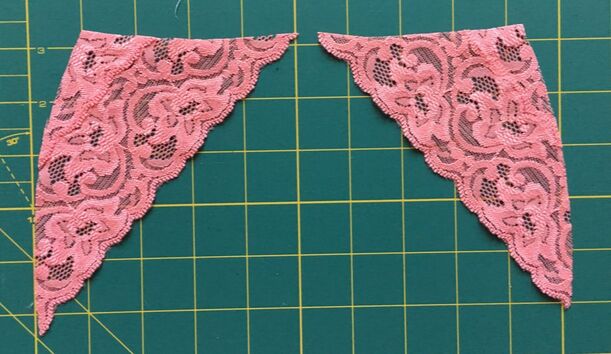 Here are my pattern pieces cut out. 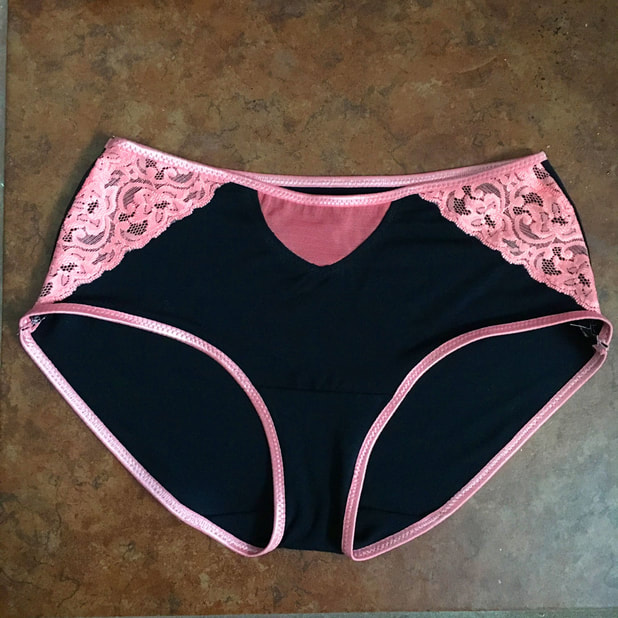 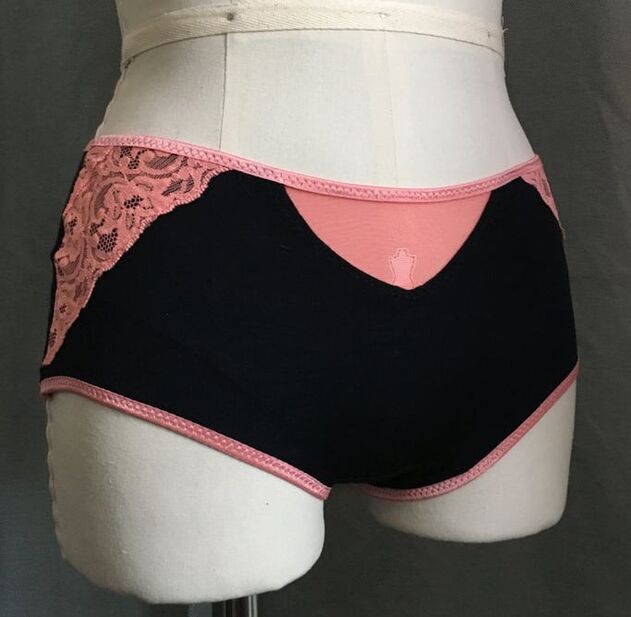 Here it is all sewn up! My first pair of panties for Knicker November! I think it looks good, and I don't think the join is very obvious.
Have you ever wanted to use a lace that was too narrow for a project? How did you solve the problem? Happy Sewing! 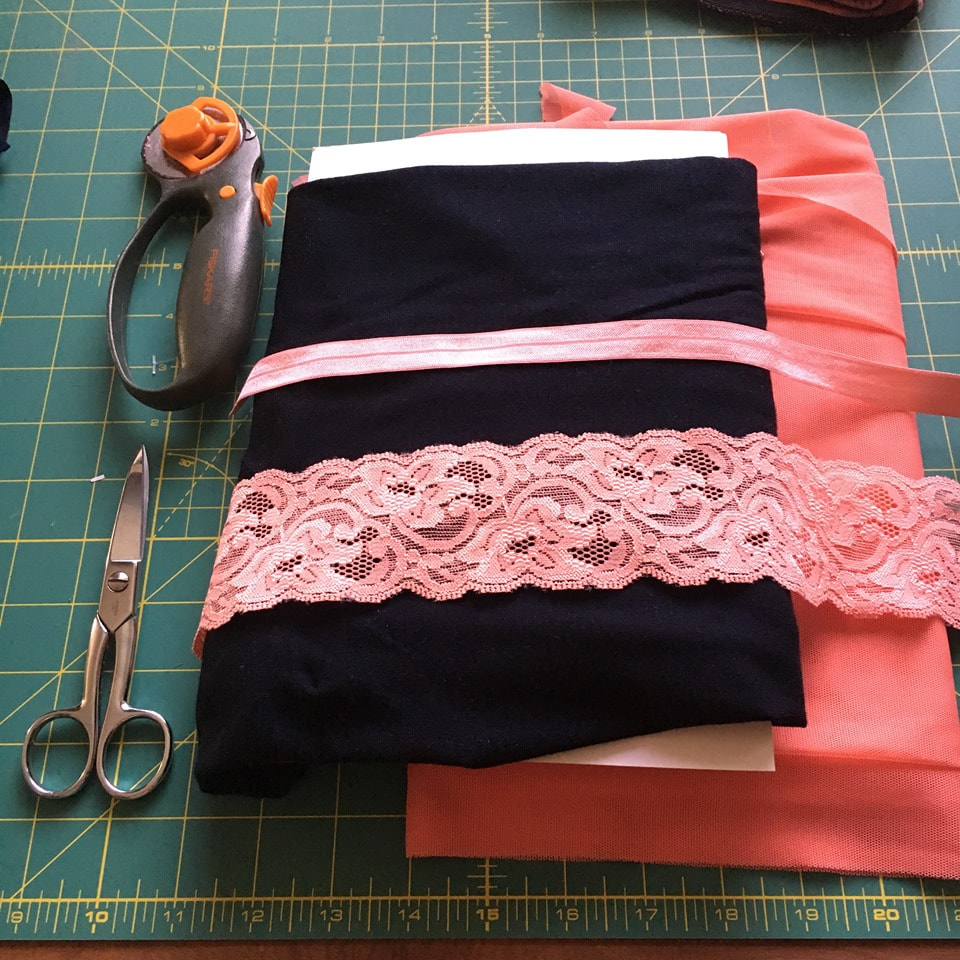 Have you heard about Knicker November? I found out about it on Instagram from Kirstin @smallbobbins. Kirstin, along with Laura @thespeckyseamstress and Romy @romy.kate are hosting a challenge to sew at least one pair of knickers (or undies, panties, underwear, whatever you call them!) during the month of November.
I already love to sew my own undies, but there is a chance to win prizes! As if I needed any more motivation! You can find more info here on Kirstin's blog. I'm already making plans to sew up at least one new pair of Daisy Briefs. Something fun with lace to match one of the bralettes from my upcoming pattern. Are you going to join in on the fun? Do you save your lace scraps? I have a small bag filled with odd-shaped pieces of beautiful lace, just because I can’t bear to throw them out. I love little lace details, so I try to find places to add in small pieces of lace. 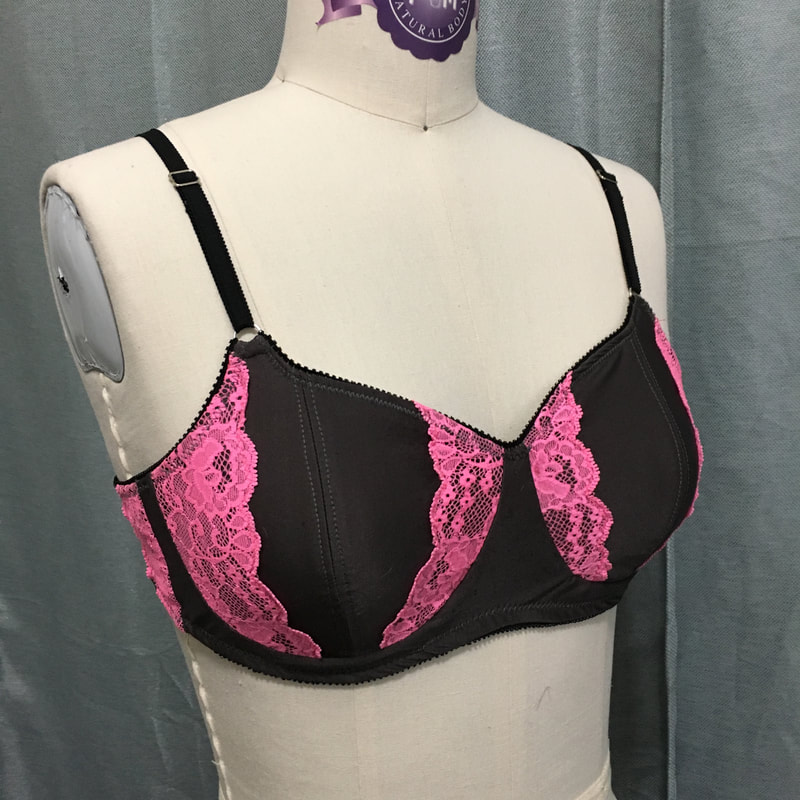 I had some long narrow pieces of lace left from panty project that didn’t work out, and decided to make up a bralette. This is one of the first few prototypes of my bralette pattern that I have been working on behind the scenes for the last couple months. The shaping of the cradle is a bit different than the final pattern. 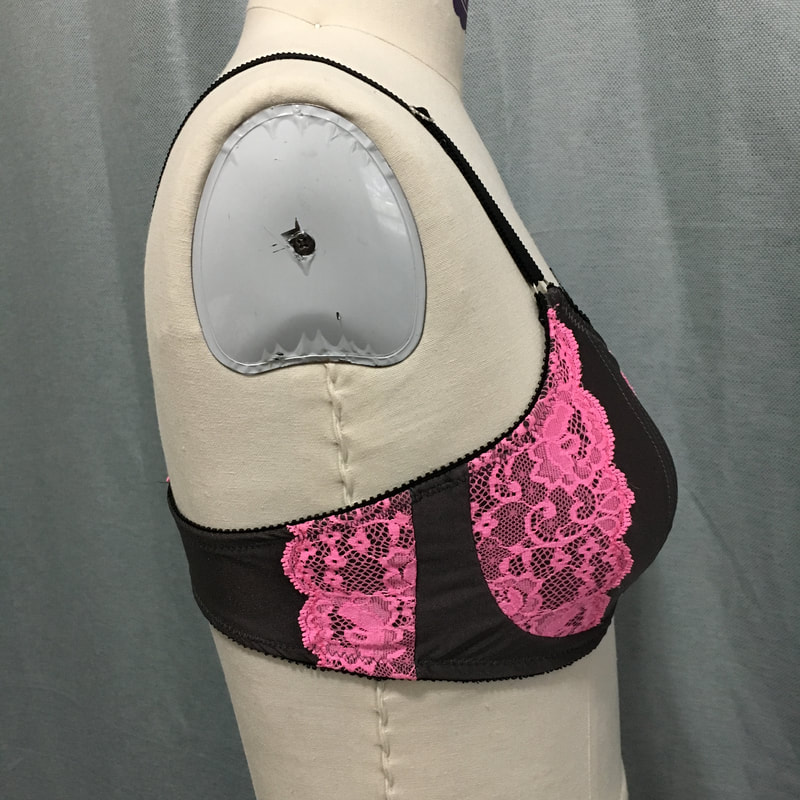 I added lace overlays to the inner and outer cups, and at both ends of the back band. Intially I had added in a piece at the center front of the cradle, and realized that it looked like a lace box, so I removed the center piece and ended up with something like a butterfly. 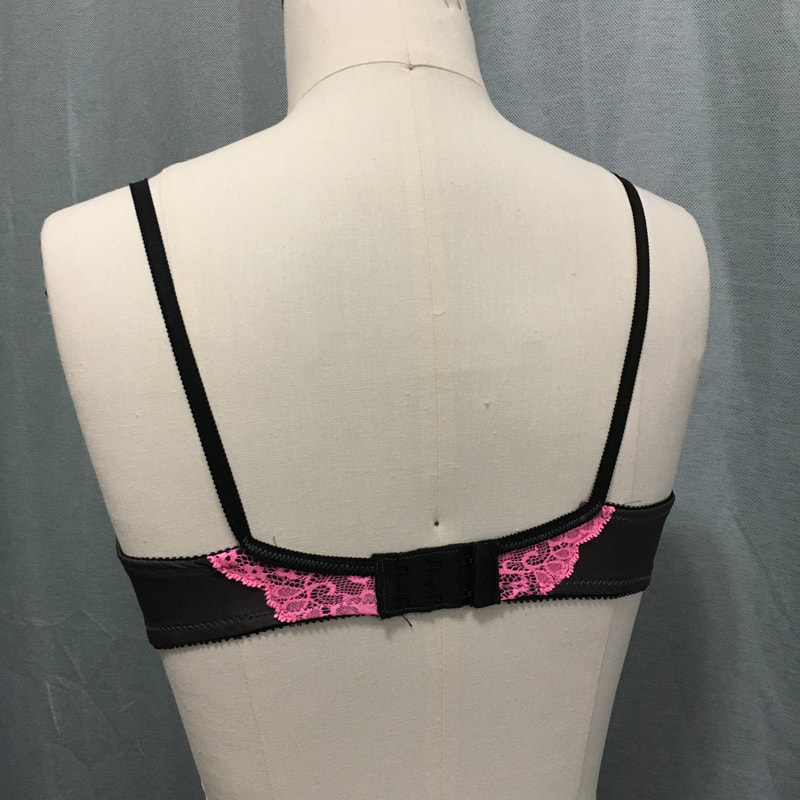 While I mirrored the scalloped edges, I can see now that the lace pattern itself is not symmetrical. Oops! Mirroring the lace pattern takes some careful attention, and isn’t always conducive to using up scraps of lace. I still love how it turned out, and have been wearing this bralette frequently.
Do you save your lace scraps? Where do you like to add them in on your sewing projects? |

CassieI design lingerie sewing patterns for everyday comfort and feminine style in an inclusive size range. Fill up your underwear drawer with beautiful custom-made bras and panties in your favorite fabrics and trims, designed to fit your body. 


Categories
All
Archives
February 2024
|


 RSS Feed