
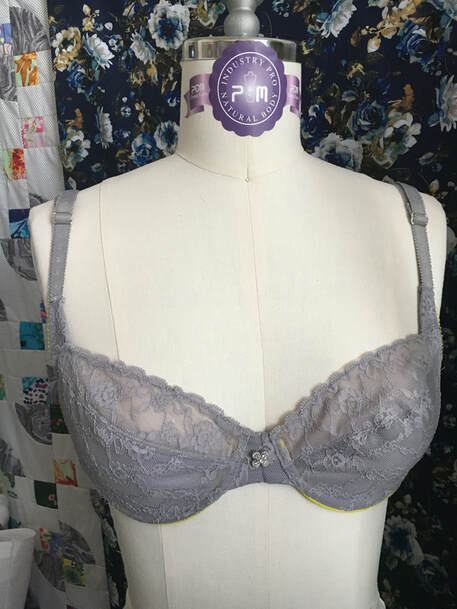
 Hello sewing friends! I'm back to share another bra project with you. It seems like every bra I make is an experiment, and there is always something I want to do differently on the next one. After I made my beige partial band bra, I wanted to make another partial band bra but with a more plunging center front. I lowered the top of the bridge and the center front of the cups. But, I didn't realize until I tried on this bra for the first time, that lowering the front really reduced the amount of coverage on the whole cup. I should have raised the side of the cup up by the strap attachment and made a steeper angle. Oh well. Another change to make on the next bra, I guess.  The cups are grey lace, with the upper cup lined with sheer cup lining and the lower cup lined with grey simplex. I will admit (with some embarassment) that I was tired when I began sewing this bra, and I did not make the best sewing choices. I thought that doing a stitch-and-flip for the cross-cup seam would be too bulky (which it was on my beige bra) so I just pressed open the seams. Well, I wasn't thinking clearly, and you can see the seam allowances through the lace. Bummer! Next time I'll do stitch and flip, then grade the seam allowances to reduce the bulk and see if that works better. 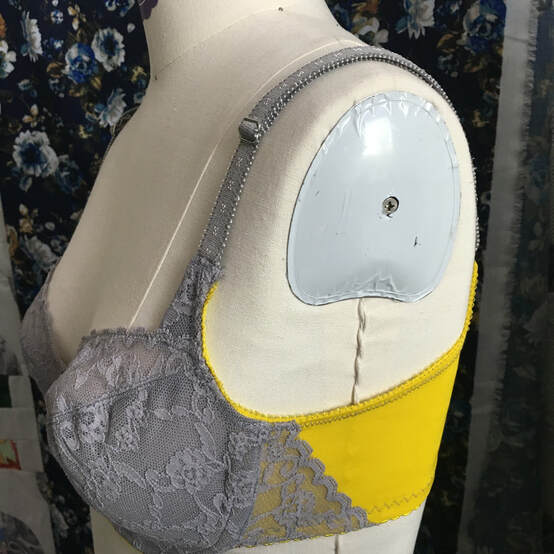 Awhile ago I dyed the simplex and straps grey for another project and ended up not liking the color combination. So when I got this grey lace, I was happy to find it matched almost perfectly. I decided to dye the rest of the components in a completely different color, and went with a bright yellow. I used acid dye from Dharma Trading. 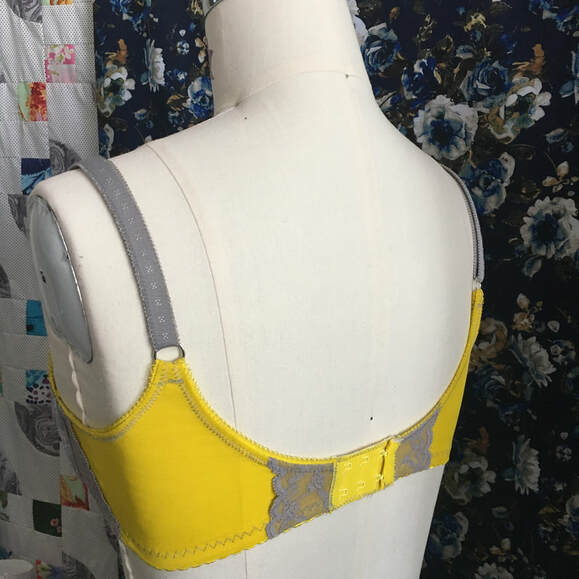 This is a Wacoal-style back, which I really like. It helps keep the straps from slipping, and helps smooth out the lumps that can form above the bra band. I have been using hook and eye tape (instead of individual heat-sealed closures) and I think I prefer their softness. Sometimes the heat-sealed edges irritate my skin, and since the hot and sticky summer is coming, I need to think about ultra-comfortable bras. 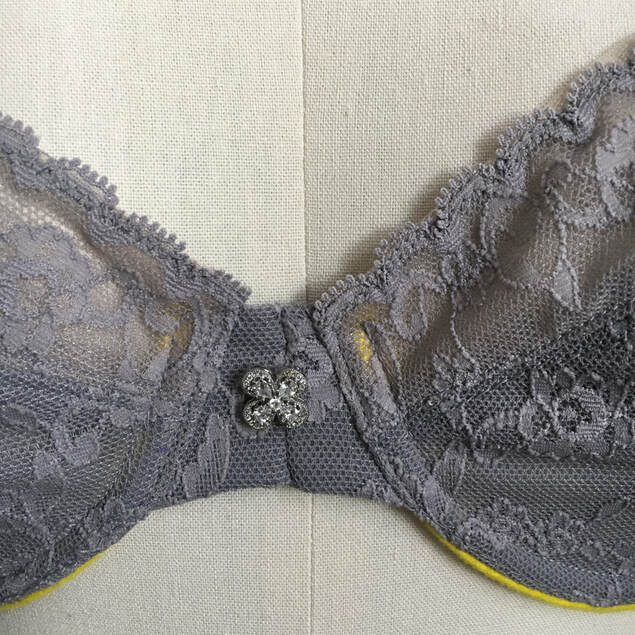 You can see I did not do a good job attaching the cups to the bridge, and they are a little lopsided (just like me, haha). Also, even though I already made the bridge narrower, it was still too wide. I took in about 1/4" with a vertical seam, and the wires are now resting where they should be. I made the front a bit too plunging, and the ends of the wires poke a bit on the breast tissue (also a problem with the bridge being too wide), so on the next bra I will raise the center front about 1/4" and definitely make it narrower. So it will still be lower than the beige bra, but not super duper plunging. I added a sparkly button, because who doesn't want a bit of bling on their bra?  Now the guts. Ughhhh, the contrasting thread really amplifies my less-than-perfect stitching skills. Don't sew when you're tired, right? Sometimes I'm just too stubborn and want to get things done.
This is a new type of channeling to me, it is pretty thick and plush. I used a very thin channeling on my pink tricot bra, and I can feel the ends of the wires in my armpits, and when it's hot and sticky outside that really bothers me. Also, I forgot about my strap attachment pieces until the cups were completely sewn. I should have sandwiched them between the layers, and instead I had to underlap and topstitch. I was using a list of abbreviated sewing steps, so maybe I need to create a more detailed order of operations. That's it for now. Happy Sewing!
1 Comment
|

CassieI design lingerie sewing patterns for everyday comfort and feminine style in an inclusive size range. Fill up your underwear drawer with beautiful custom-made bras and panties in your favorite fabrics and trims, designed to fit your body. 


Categories
All
Archives
March 2024
|
 RSS Feed