
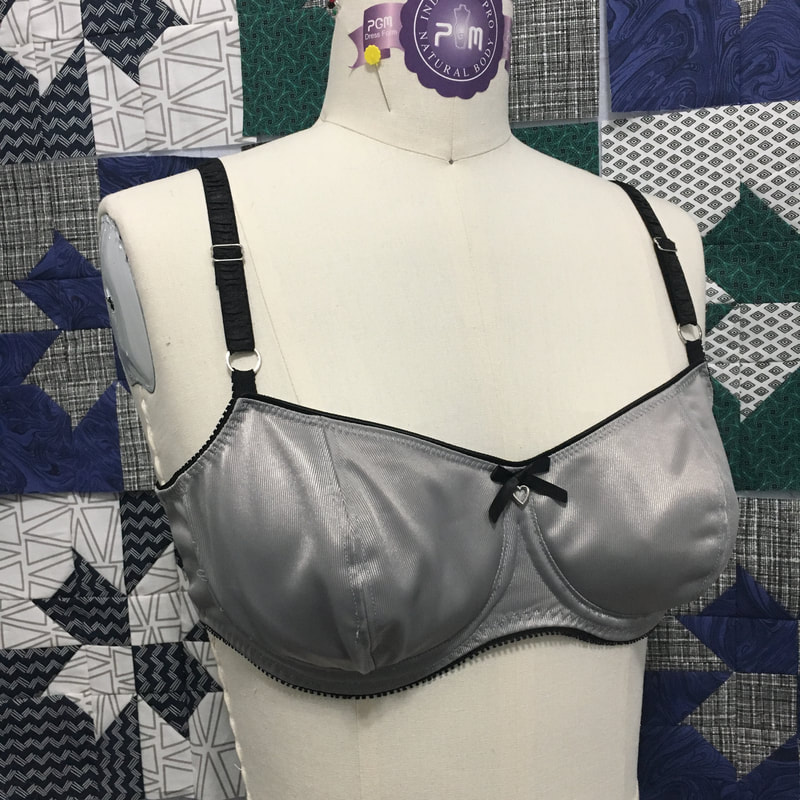
 Here it is, my first bra made with my custom bra sloper using the drafting method from Bare Essentials Bras, 3rd Edition by Jennifer Lynne Matthews-Fairbanks. Pattern: self draft, 2-piece vertical seam cups with full frame. Underwire: Carmen by Emerald Erin Fabrics: Grey duoplex and powernet I think from Bra Maker's Supply. Elastics: 3/8" & 1/2" black picot elastics from Fabric Depot Co. Piping edge elastic along the neckline from Sew Sassy. Straps: 1/2" ruched strap elastic. Can't remember where I bought it, sorry. Bow: 1/4" satin ribbon, heart charm from Joann jewelry department.  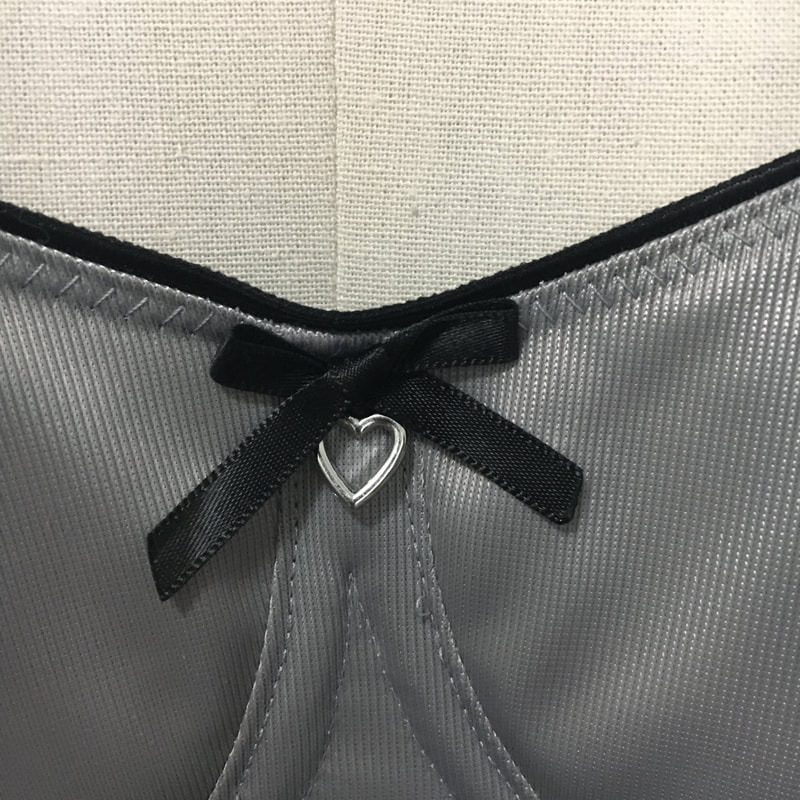 While I would not say that sewing a bra is hard, there are always a few parts I struggle with. Every time I sew a bra, I try out a new technique or two to see if I can improve my sewing experience.
This time around, there were two areas I wanted to try something new: encasing the ends of the channeling at the front, and making a strap attachment less bulky. For the channeling, I'd normally have the ends extend past the edge of the cradle, then close them off and trim them at the end after everything else is sewn. I think I learned this method from the Harriet Bra instructions. But after seeing a few Emerald Erin bras that use the neckline elastic to finish the top of the cradle as well as the cups, I decided to see if I could get the ends of the channeling under the edge of the neckline elastic. I started the channeling 1/4" down from the edge, since I was using 1/4" elastic. I didn't quite get the ends under the elastic, but at least they aren't sticking out past the top of the cradle. I usually attach the ring to a strap attachment that is part of the cup. So far that has led to a very bulky seam that usually breaks my needle with several layers of fabric and elastics all coming together. This time I decided to just let the armhole elastic extend past and thread the ring through that. I probably should have made a tighter loop against the cup; it stretches out a bit when worn, obviously because it is elastic. But this join was much easier for me to execute and left me with a much smoother fold. Do you have any tips for sewing channeling or attaching the straps? I'd love to hear them, leave a comment below. Happy Sewing!
0 Comments
 Yesterday I sewed my first Darcey Bra by Evie La Luve. My feelings about it are a bit mixed, but I think I will sew myself another Darcey Bra in the future with some modifications to the fit and the fabric choice.
 Yesterday I had a bit of time for some personal sewing, so I tackled a project I cut out awhile ago and left languishing in my project box. This is the Mirri Wrap Dress by Wardrobe by Me, top version. When this pattern was first published, I saw lots of tester photos and it seemed to be a universally flattering style. It also seemed like the wrap generally stayed closed on most people, which is always a big problem for me. I decided to try it out in a top before plunging into a dress. I was tired when I printed out the pattern and totally forgot about the layers option and ended up printing out all the sizes. So. Many. Lines. Do yourself a favor and print only the sizes you need! I cut a straight size 8, which seemed to match my measurements perfectly. 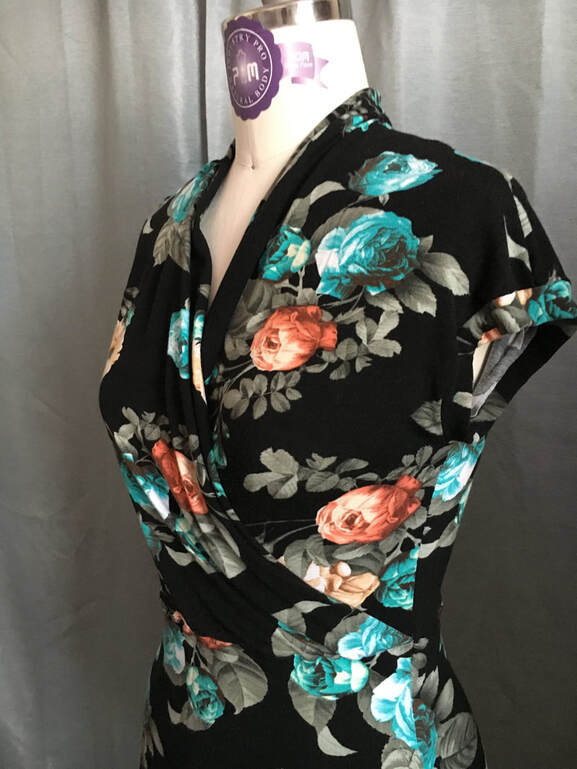 I read the directions before I started sewing and it all seemed straightforward and clear, but I still managed to struggle right from the beginning. The first step was to form the pleats on the front and I had to pin the darn things three times. I think the directions seemed to say to pin the pleats one direction and the illustration shows them going the other direction. Also I was working with rayon/spandex jersey, which is heaven to wear but so limp while sewing. Anyway, I finally got the pleats to cooperate. The other step I struggled with was sewing the collar extension to the back neck, and then sewing the shoulders. Somehow I managed to sew the collar bit upside down, so I ended up with a big twist. I unpicked the seam (thankfully, I wasn't using my serger!) and decided to sew the shoulders and back neck all in one seam. Not as tidy, but easier to wrap my brain around. The rest of the sewing was easy and worked out well. 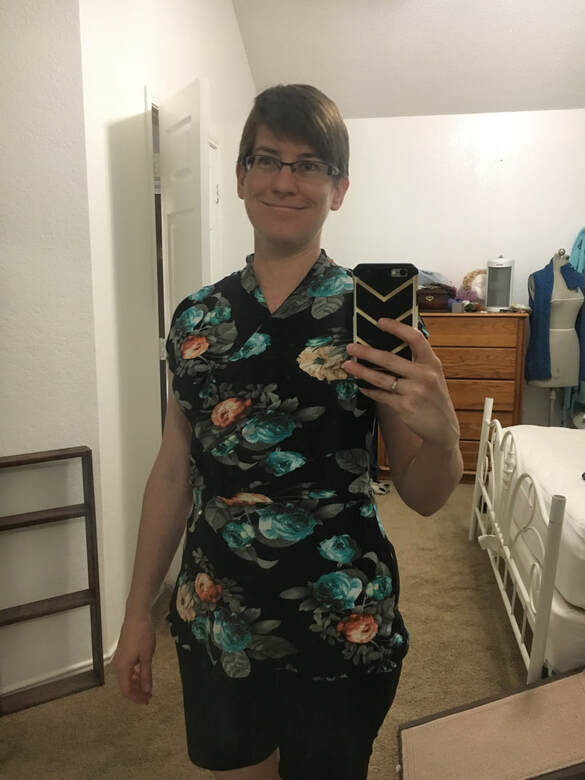 Of course I had to include my blurry mirror selfie, haha. I always show you the clothing on my dress form and never myself. Well, I'm happy with how it came out. I wore my new top today, and for the most part the wrap did stay wrapped and my modesty was preserved. I think using a more substantial fabric would make it easier to form the pleats, and also for the wrap to stay wrapped. Next one will be one of the dress views, probably in a printed cotton spandex.
Happy Sewing! 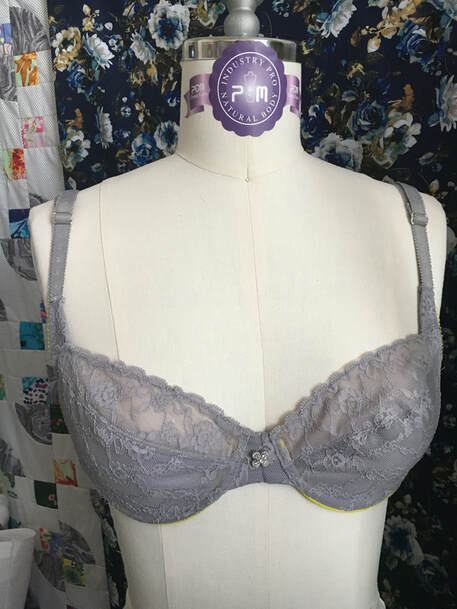 Hello sewing friends! I'm back to share another bra project with you. It seems like every bra I make is an experiment, and there is always something I want to do differently on the next one.
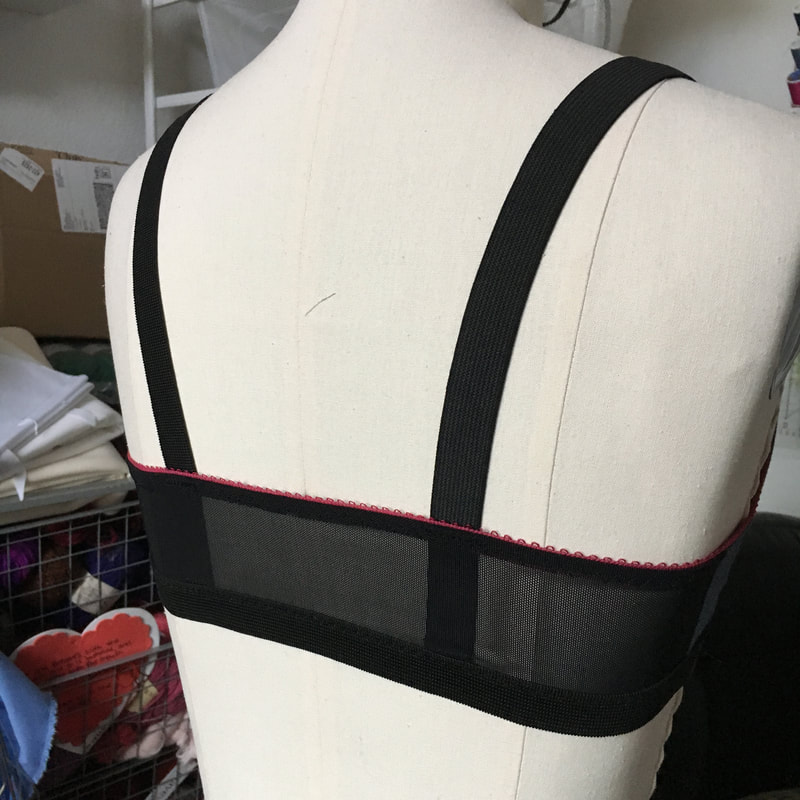
 Yesterday I made my first partial band bra! Back when I wore store-bought bras, partial band styles were what I usually went for. So why did it take me so long to make one? Well... I guess I wanted to perfect the fit on my full-frame bra before jumping into more patternmaking with a totally different style. I followed Beverly Johnson's instructions (from her Bluprint class "Sewing Bras: Designer Techniques") for making the partial band pattern, and I have to say it made me nervous. I understood adding an allowance for the channeling to the cups, but removing the seam allowance from the bridge just didn't seem right. But Beverly must have read my mind because she even said it might not seem right and to just trust her.  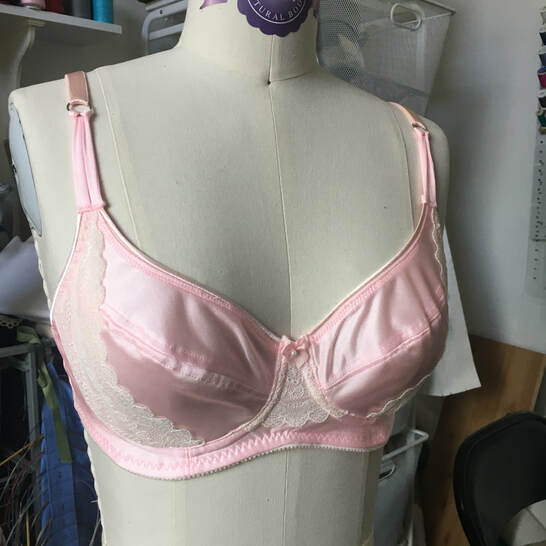 I made a new bra today, and I'm quite pleased with how it turned out. I'll start off by saying my dress form doesn't really fill it out properly; it fits me perfectly! This is the diagonal seam cup I tested out on my bra fitting band. The lace sling is the same pattern piece that I used in my black lace balconette, but in this case is purely decorative and not functional as a powerbar.
In my previous post, I shared how I altered the Barrett Bralette pattern to fit me. Last week I realized that most of my old sports bra are falling apart, so it was time to cut out another Barrette. I have a large pile in the corner of my bedroom of clothing and other items that are going to be donated to the local thrift store. My husband likes to fling just about every old thing into the pile, without really discerning whether anyone would actually be likely to buy it. One of the pieces of clothing in the pile was an old t-shirt, which had a neck band that was stretched out. I really liked the fabric, a cotton/poly jersey in blue and black, and decided that since it was too worn out to donate I would cut it up into a couple sewing projects. So far, that one t-shirt has turned into two pairs of panties and a bralette. I'd say that is a pretty good deal! 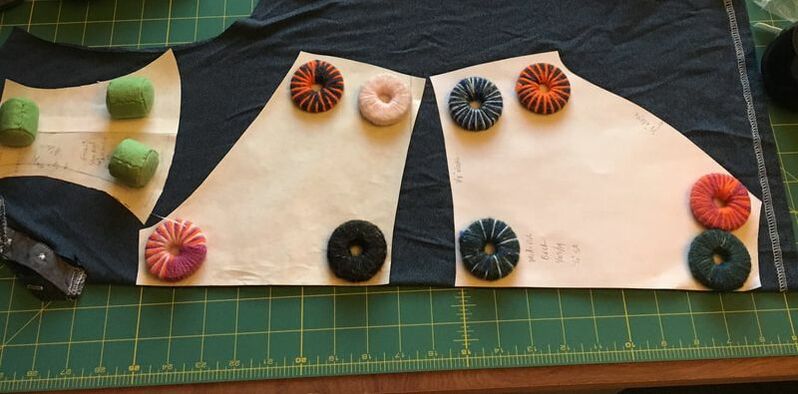 Pair of briefs from the pattern I am developing. Careful placement of the pattern pieces allowed me to cut a pair of panties from the front of the t-shirt 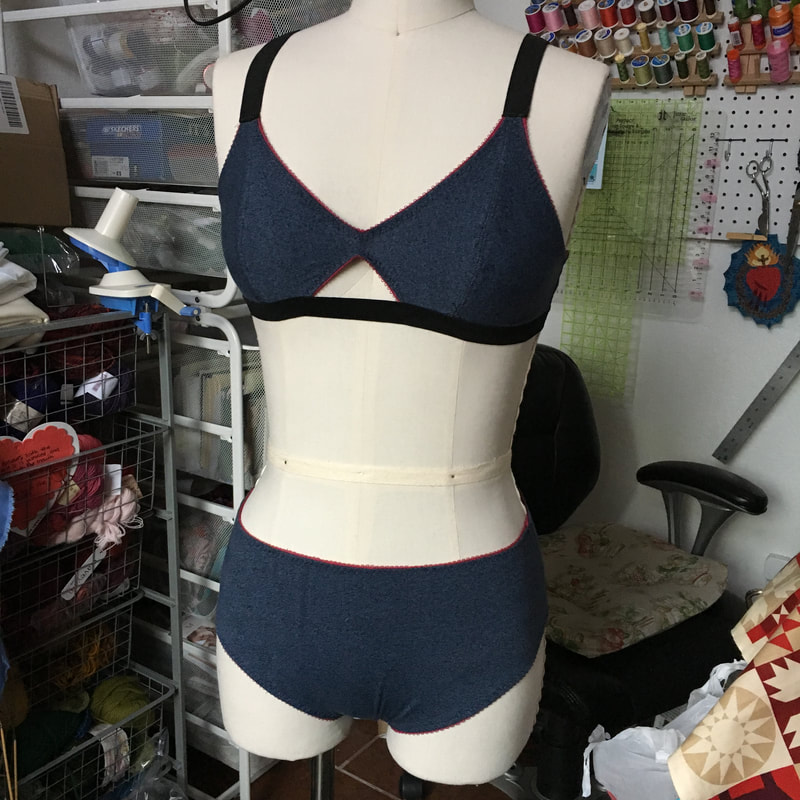
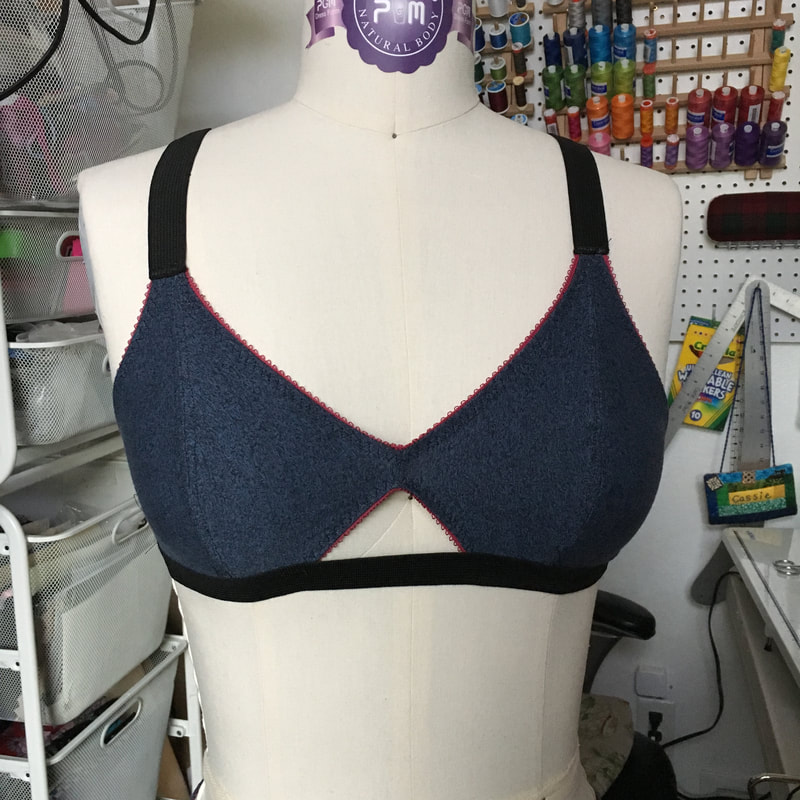
 It bothers me when trims don't perfectly match the fabric color, so I tend to go for contrasting colors. I had some magenta picot elastic (from Lace Heaven) and I really like the bright pop of color it adds. The back band is black powernet. This time around I didn't add a lining to the cups, so I topstitched the seam allowance open. We shall see if the raw seam allowances are irritating to my skin or not. Also, I used my 1" black elastic again for the straps and band. If you read my previous post, you know why!
Have you cut up old clothes and turned them into new creations? Yesterday I finished sewing my second Barrett Bralette, a free pattern from Madalynne. Before I share my newest project with you, I wanted to share my first Barrett Bralette and how I altered the pattern to fit me. It seems like this sort of bralette only works well on small cup sizes, so when this pattern was published I was anxious to see how it worked on women with small rib cages and larger cup sizes. On Instagram I saw Barrett Bralettes on a wide variety of figures, and realized I had two options for altering the pattern to work for me. For reference, my underbust measurement is 31.5" and my full bust measurement is 37". I usually wear a 32D in my handmade bras. Options for altering the pattern: 1. Use a large cup size and pair it with a small band. 2. Use a small size appropriate to fit my underbust measurement and increase the projection. I decided to go for #2, since most of my fullness is in the lower cup, and I prefer not to have a lot of fabric in the upper cup going towards my armpit. According to the pattern directions my underbust measurement would have technically put me in an x-small, but I decided that would probably be too tight and cut a size small instead. At the apex (fullest part of the bust) I added 3/8"on both the center front and side cup pieces and gradually blended back to the size small. Why 3/8"? To be honest, it was just an educated guess and luckily it worked for me. 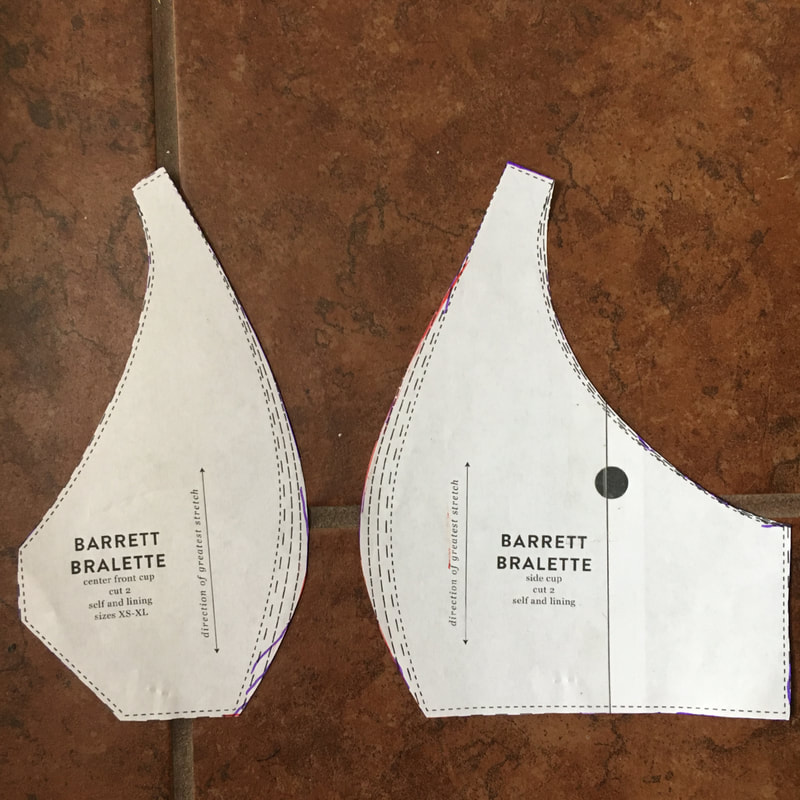 I cut my project from cotton/lycra jersey and lined it with stretch mesh. I planned to use this bralette as a sort of sports bra, but I don't do very vigorous exercise so a super supportive bra was not necessary for me.  One of the changes I decided to make was to use 1" elastic as both the straps and the entire back band. Why elastic only? Well, there's a story to tell and I'll get to that once I finish showing you my bralette. 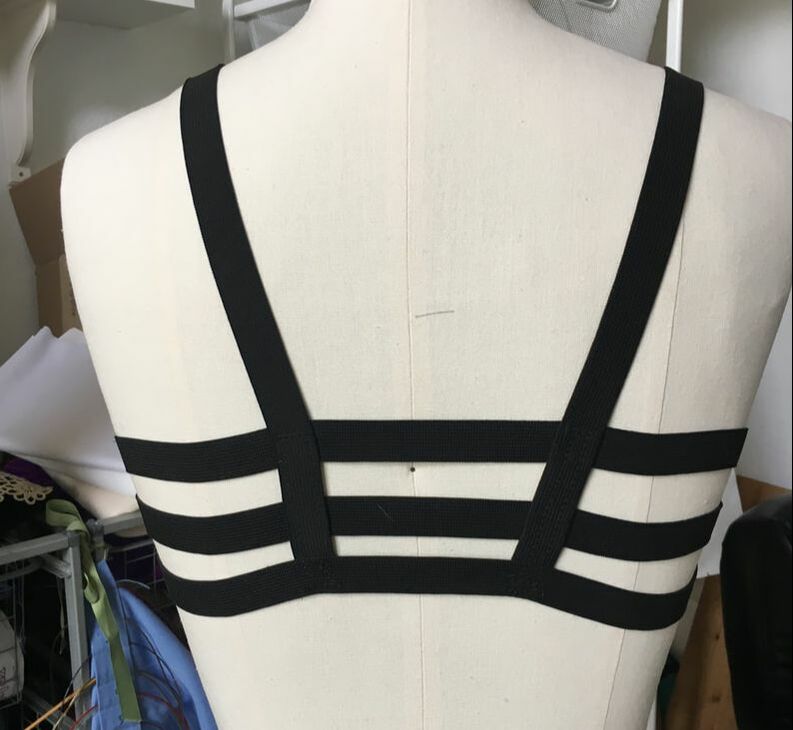 I used the back band pattern piece as a guide and cut three lengths of elastic. I basted them to the edge of the side cups, then topstitched down the entire seam. To secure the straps to the back elastics, I sewed a zigzag box over all the crossing points. 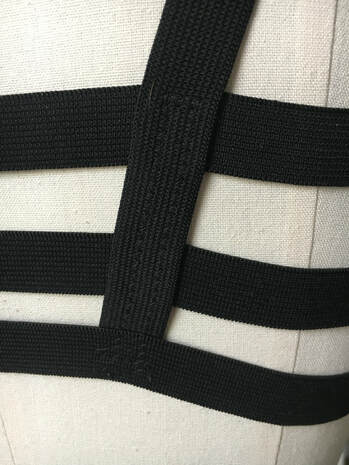 I'm quite happy with the fit and feel that it gives me a good amount of support for a bralette. I think using a strechy-but-firm knit fabric really helps to provide support, and so does adding a mesh lining. I like to show the guts of my bra makes, even if they are a bit messy. Please excuse any wonky stitching. 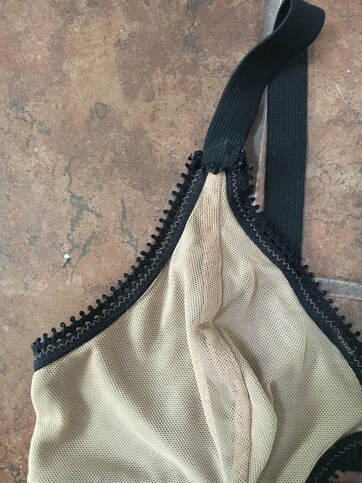 Now.. why did I use so much 1" wide black elastic? Because I have lots of it. Lots and lots of it. 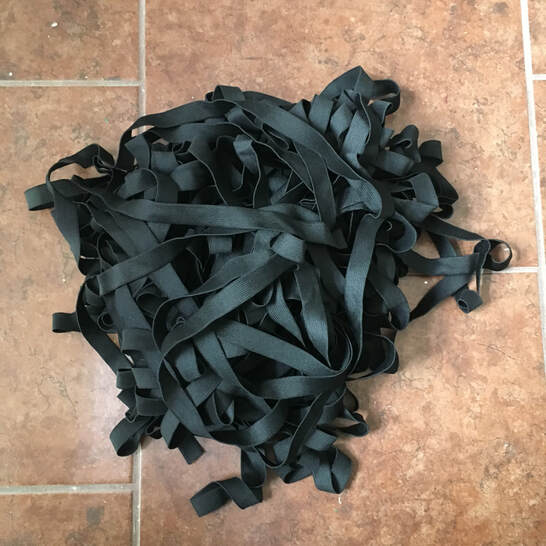 My husband spent all of 2016 stationed in South Korea, about 20 minutes from Seoul. He is a brave and adventurous type (and also has a degree in anthropology), so on his days off he'd hop on the subway, pick a random exit, and just explore the surrounding area. One day, he happened to stumble upon Dondaemun, Seoul's fabric market. Seven floors of fabric, trims, and commercial embroidery and sewing. He was amazed by all the vendors and wanted to get something for me. At that time I was beginning my bra-making journey, so I sent him swatches of the plush back elastics and straps that I was looking for. While I am blessed to have a husband that is eager to do nice things for me, he doesn't quite have the eye to pick out things that match the samples I give him. He found a vendor selling this black elastic and thought he had hit the jackpot. The vendor did not speak English, but through a few Korean words and gestures, Aaron thought he communicated that he would like five yards of elastic. The man nodded and began unrolling the elastic and measuring. And measuring and measuring, and unrolling and unrolling. Aaron became alarmed when the pile of elastic grew bigger and bigger and quickly looked up the Korean word for five (daseos) and waved his five fingers. The man nodded his head and just kept measuring. Aaron's friend said "Dude... I think you're getting that whole roll." Sure enough, that is what happened. The man shoved all the elastic into a grocery bag and wrote up the bill... which, translated into American dollars was a grand total of $15. Hah! Quite a good deal. While not plush back elastic, it is quite soft against the skin, and not overly firm like packaged elastic. So I am happy to use it in sports bras and waistbands. 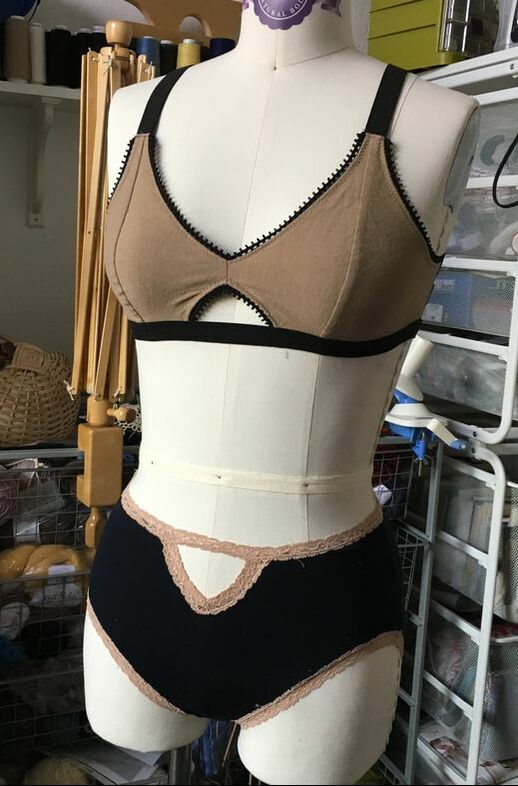 I put my bralette on my form to check the strap placement and realized that with my latest pair of briefs (from the pattern I am developing, stay tuned!) I had inadvertently created a matching set.
Have you tried the Barrett bralette? What do you think of the fit? Also, have you been to any of the amazing fabric markets around the world? Have you found any good fabric and trim deals? I wrote in my previous blog post about why I began making shirts for my husband. So far I have only made two shirts from his custom-fit sloper, so we are still on the long journey of tweaking the fit. I made two basic patterns, one a 'standard' fit and one 'closer fit'. I usually make him an article of clothing for every gift-giving holiday. A few months ago I found some red/blue cross dyed cotton/linen on clearance in my local quilt store, and thought it would be perfect for a shirt. On the day I went to cut out this shirt, we were having some bizarre weather and it happened to be 80 degrees in early February. I realized that winter wouldn't be around much longer, so I opted for short sleeves. Fine by me, less fuss if I don't have to make a sleeve placket and cuffs! One of the things that drives me crazy about home sewing patterns (especially from the Big Four) is directions that include hand-sewing. There is no hand-sewing in mass-market production of clothing, so I know there must be a way to do it all by machine! Sometimes it seems the directions, especially for finishing, are purposely done so that the end product just screams homemade. So here are a few things I've learned for sewing professional looking shirts. If you want to learn some shirtmaking techniques, I recommend the book Shirtmaking by David Page Coffin. Especially for sewing the collar and cuffs, which employs the 'burrito method'. Nice crisp edges where everything lines up. The Sewaholic blog also has some great posts about sewing the collar and placket. 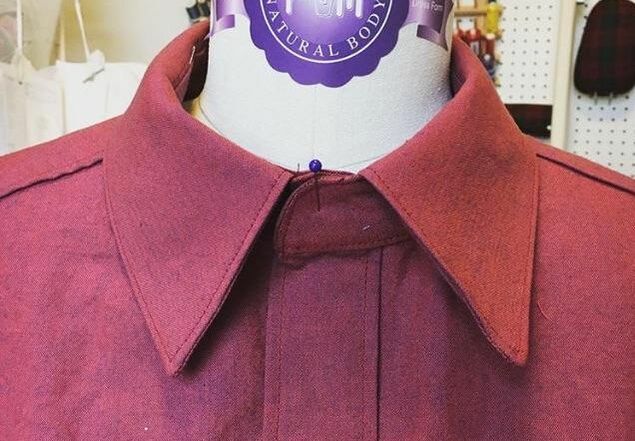 What else makes a good collar? Decent interfacing. And no, not the Pellon interfacing from Joann. I like to use Shirt Crisp from Fashion Sewing Supply. It's a bit expensive, but since I only use it in the collar and cuffs, a yard will last me quite awhile. The collar and cuffs end up so smooth, I love it! In the first sew shirts I made, I really struggled to get nice edges for my patch pockets. Then I saw a tip somewhere, I think it was the Colette sewing blog, to baste the pockets together, turn them RS out and press well. Then pull out the basting and you have nice crisp edges ready for sewing. 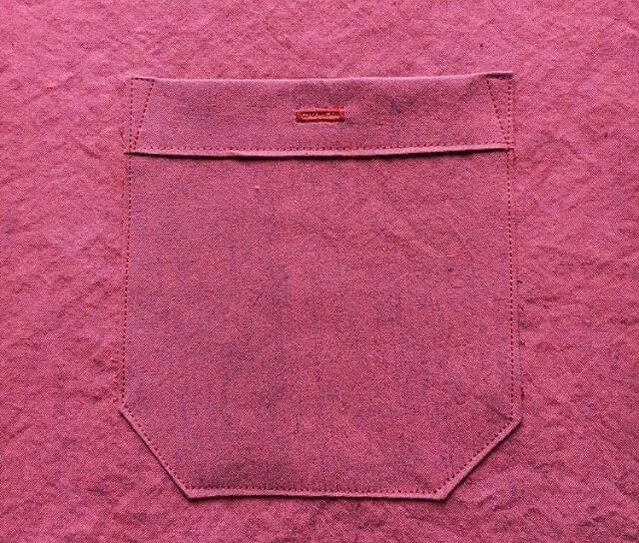 As you can see, my edgestitching still needs some work. Lots of edgestitching and/or topstitching is another thing you can do that will make your shirts look professional and not homemade. I spent some time examining the dress shirts in my husband's closet, and found that most of them had body and sleeve seams that were flat felled. I bought a flat felling foot for my machine on Amazon and figured out pretty quickly how to use it. Some people just use a regular presser foot and do some trimming, but I'd rather have the foot help me turn under the edge. While it works great for straight seams, setting in the sleeve was a bit challenging for me and I ended up with some puckers and ripples. 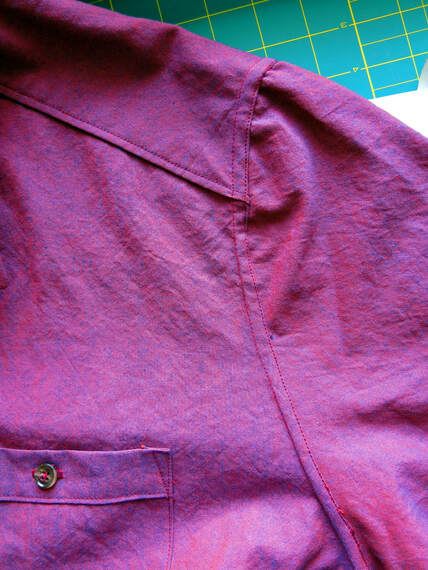 During the fitting process it seemed like a regular shirtsleeve with a wide and shallow cap just doesn't work well for him, so I was attempting to flat fell a pretty curved sleeve cap. I might have to alter my pattern a bit to reduce the curve just to make it easier to sew, or turn to french seams in the sleeve cap. 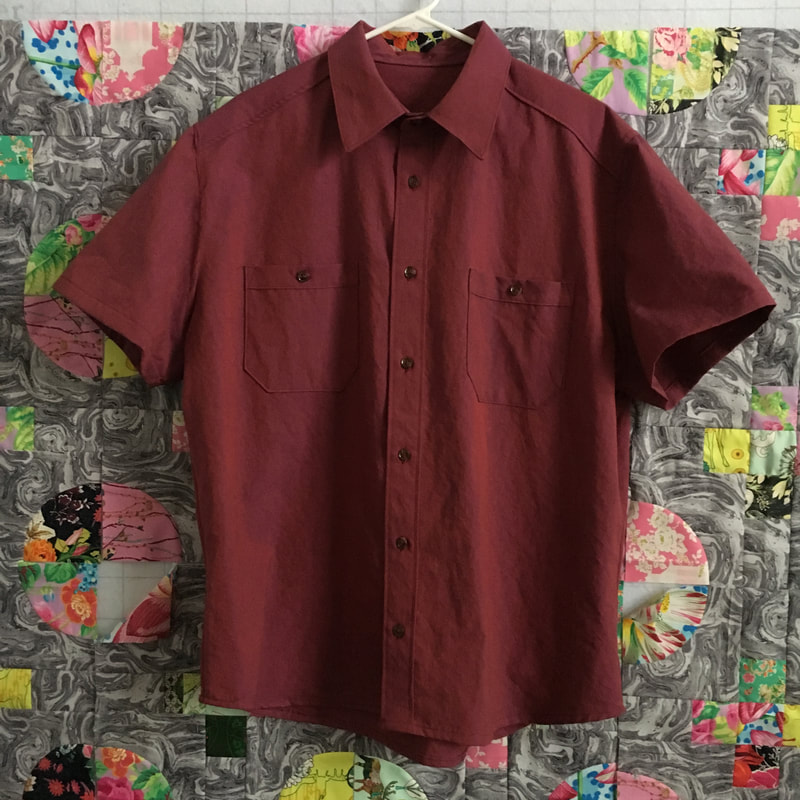 Overall I'm quite happy with how it turned out. My new Juki machine machine (an Excel F600) makes beautiful buttonholes, so there was no crying this time like there was on previous shirts, and there was no cursing and broken needles while topstitching through all the layers in the collar. 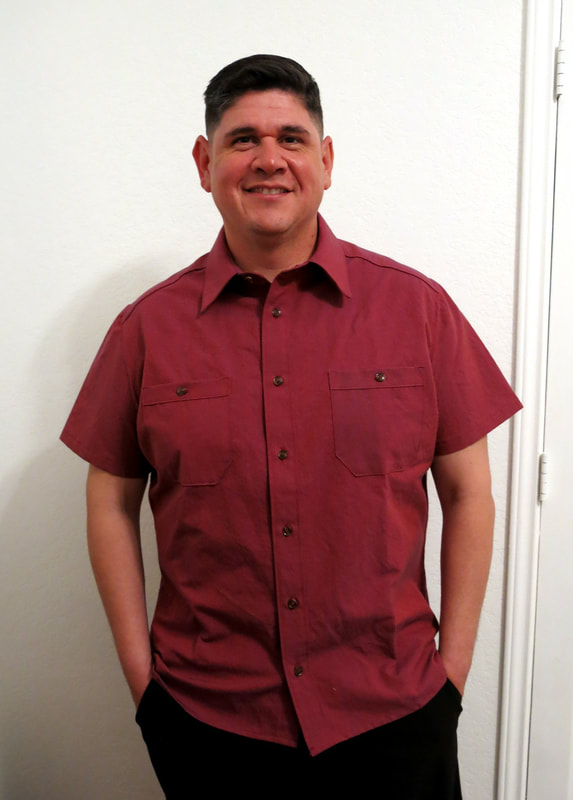 And, best of all, here is my happy customer. This big grin is why I sew.
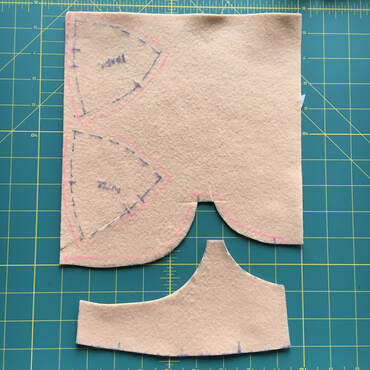
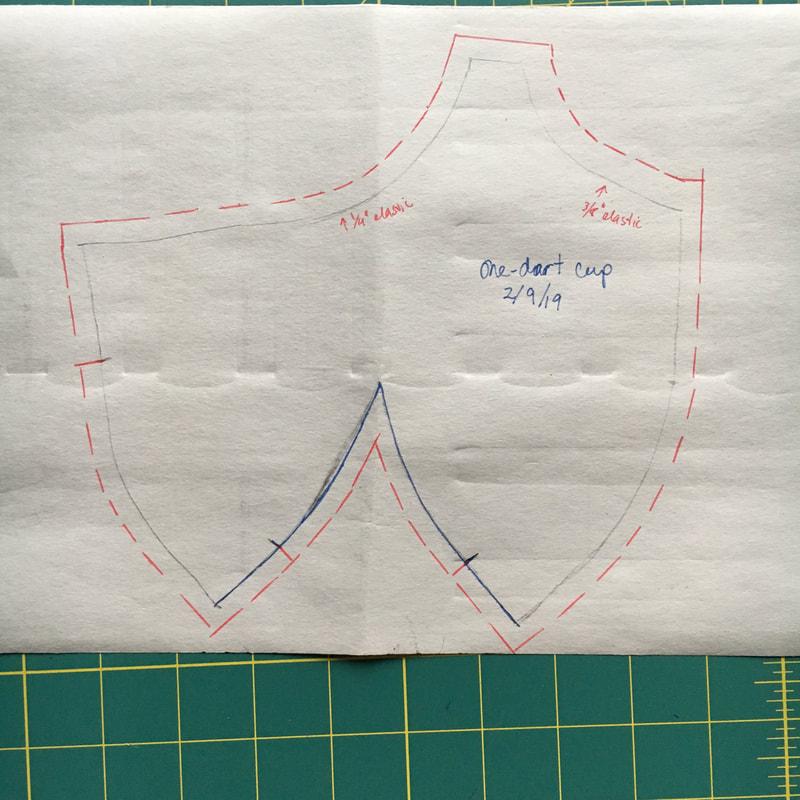
A couple weeks before Valentine's Day, someone in the Bra Makers Group on Facebook mentioned quarter-cup bras and it got me thinking about barely-there bras more suitable for boudoir than everyday wear. Later on I came across this series on power bars by Silver Lining Atelier, and this bra in the photos. 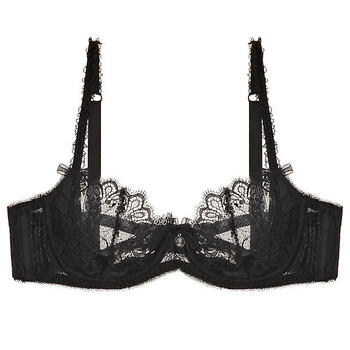 Photo from Silver Lining Atelier Thinking back to the discussion on quarter-cup bras and my interest in trying out an internal power bar, I decided to try making my own version of this bra. My self-drafted bra has a horizontal cross-cup seam, so in order to make the scallop edge of the lace across the top edge, I needed to draft a one-dart cup. In Beverly Johnson's bra-making classes on Bluprint (formerly Craftsy) she uses bra foam to sew up a cup, then draw the new seamlines and cut it apart to form the new pattern pieces. I only have a small amount of bra foam, and I didn't want to use it up so I wondered what else I had on had to use as a substitute.
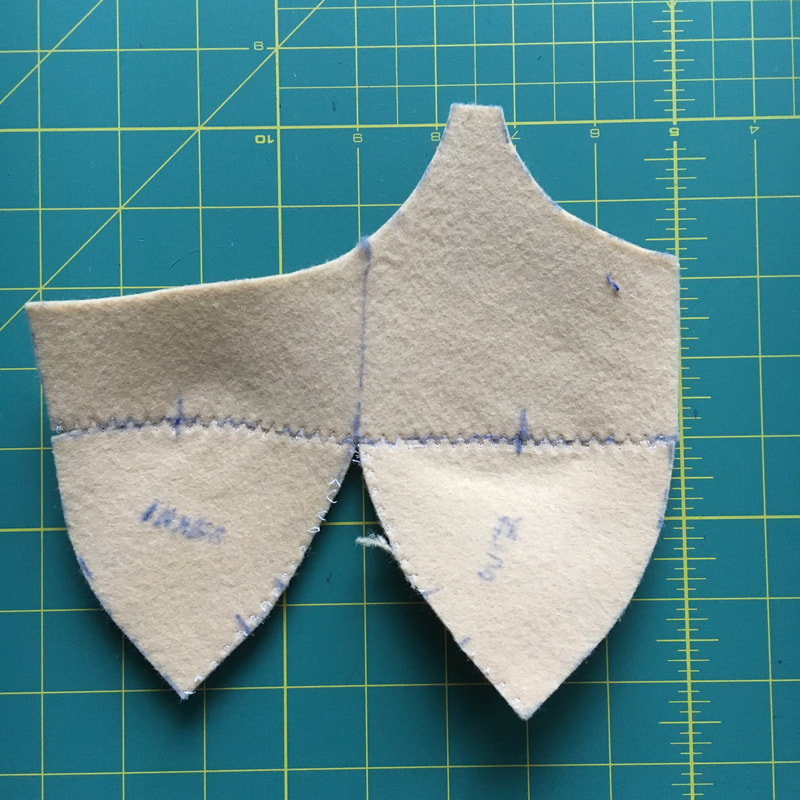
Felt! I had lots leftover from making Christmas stockings. After trimming off the seam allowances, I used a 3-step zigzag to sew the cup pieces together.
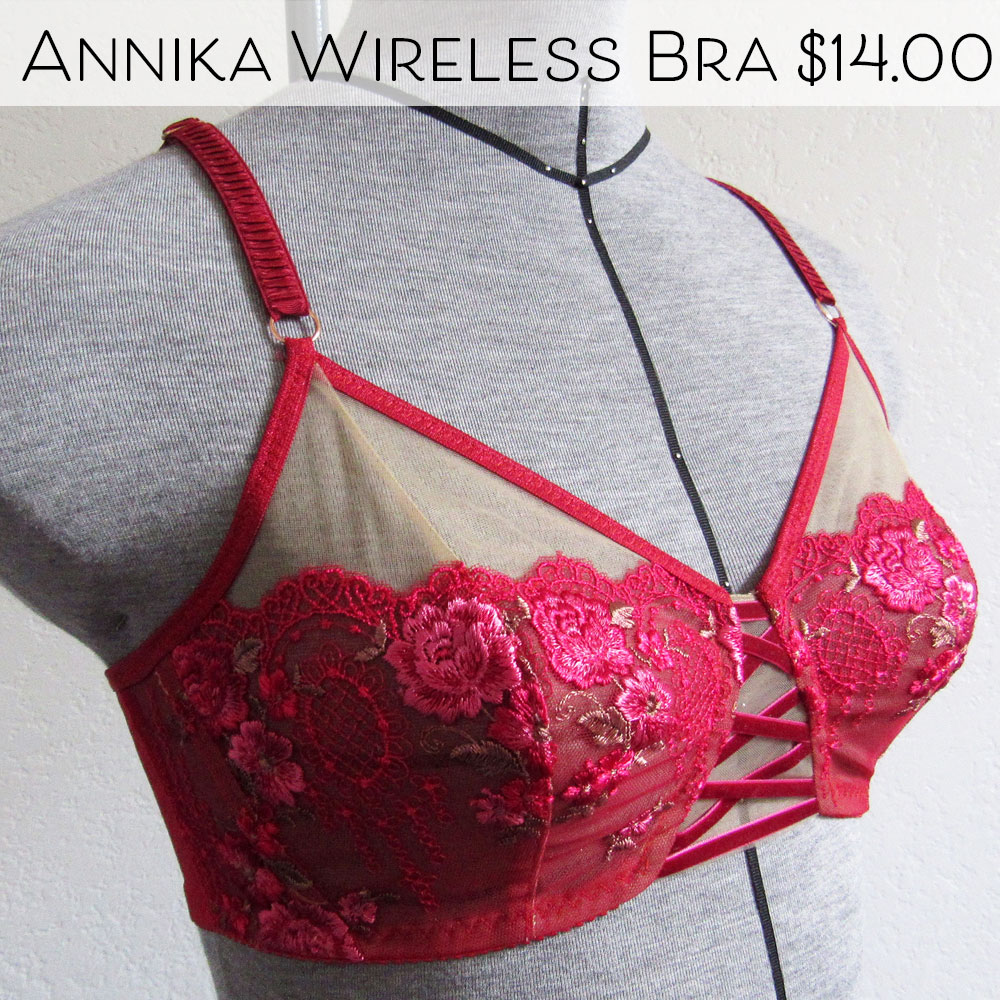
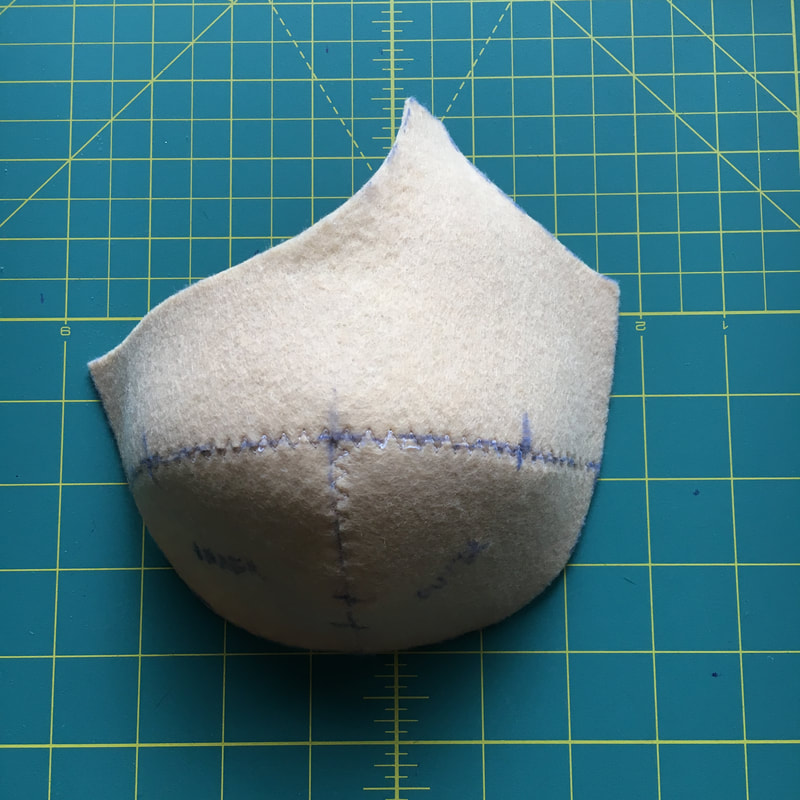
After sewing the cup, I realized that the dart would be right where the lower cup seam was, so I just cut open where I sewed. Seems a bit counterproductive, and there is probably a more accurate way of doing it with the paper pattern. I'm sure I'll learn someday! So to make the balconette cup, I cut off the cup about 3/4" above the end of the dart. I should have checked the measurement of the top of the cup, but I didn't and it ended up being too big. I unpicked some of the sewing on the narrow elastic and shortened it to create more tension across the top of the cup. Still not a snug fit, but this bra is more for show than function. 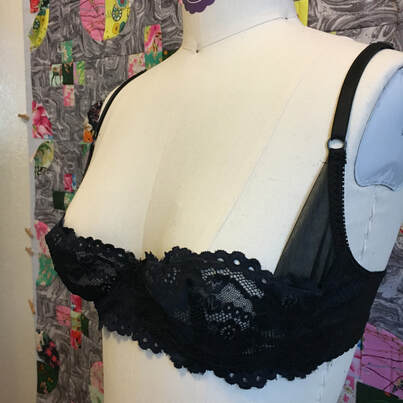 While the fit isn't perfect, I'm quite happy with how the overall design turned out. The power bar does it's job and directs the breast tissue toward the center. 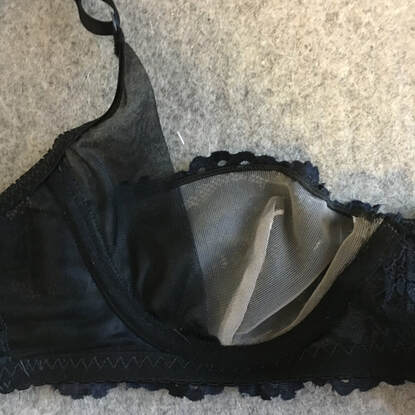 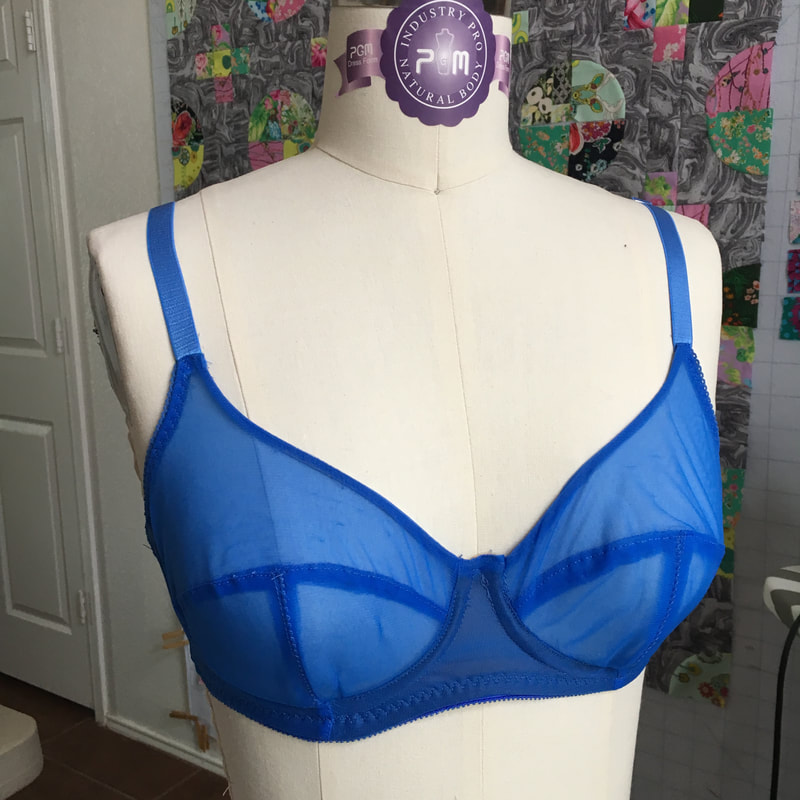  This is the second bra made from my self-drafted bra pattern. My first bra from this pattern had a few issues, mainly fabric bunching up at the side of the band and not enough room for the wires. I changed the angle of the frame/band to go more downwards, and raised the underarm edge to provide more coverage and leave some room for wire play. The fabric is a 15 denier nylon sheer from Sew Sassy. Elastics are from Lace Heaven. I used two layers for the cups, cut with opposing stretch and sewn separately. After I finished sewing both layers of cups I realized it would have been better to sandwich the layers so I wouldn't have to worry about the seam allowances overlapping perfectly. To finish the neckline, I sewed bother layers of the cups together, then sewed 1/8" elastic in the seam allowance. Clear elastic and I do not get along, so 1/8" elastic is the best I can do. To prevent the cross cup seams from drifting apart, I lined up all the seams used a narrow zigzag over the lower cup seam. We'll just call that a 'design feature'. Funny story about the cradle lining; I only have white and black, and since this fabric is so sheer I wanted a nude color. So I thought since I had some brown Rit Dyemore, I'd just do a quick dunk in a dyebath. Well, I added too much dye and the fabric very quickly became a chocolate brown. Oops! 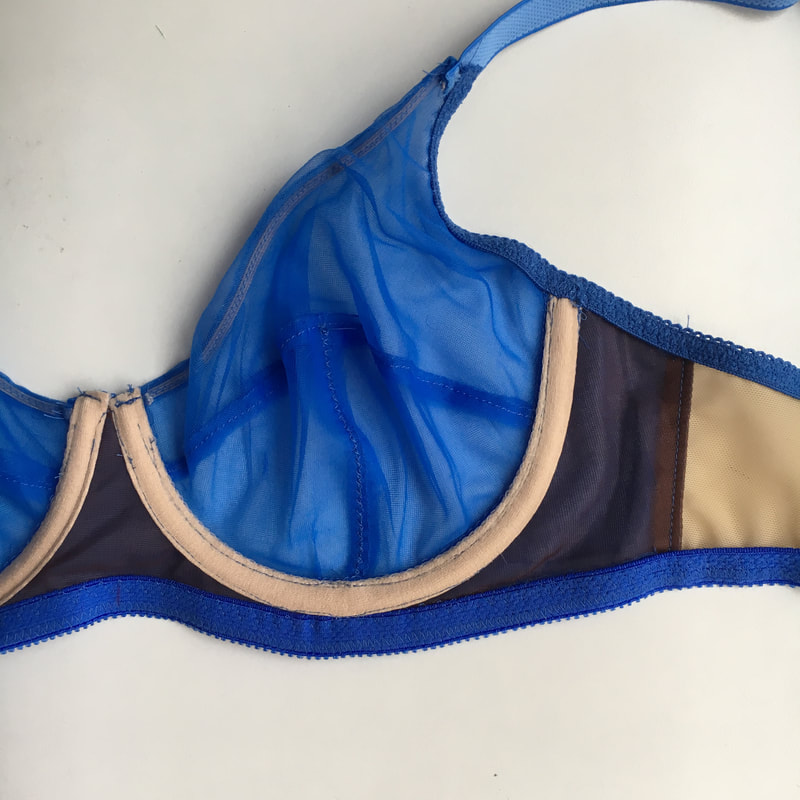 I used a different method of strap attachment and it was much less stressful, and I didn't break any needles. Before sewing on the underarm elastic, I lined up the edge of the strap with the neckline edge and sewed them RS together. Then when I went to sew the underarm elastic I made the edge as close as possible to the strap, so that when the elastic flipped back it would lay nice and smooth.
I'm quite happy with how this bra turned out. There is still a bit of bunching at the sides, so I'll work on that more. The wires also still don't have a lot of room to move around, so I'll check my pattern against the wire to see if the error is in the pattern or my sewing. |

CassieI design lingerie sewing patterns for everyday comfort and feminine style in an inclusive size range. Fill up your underwear drawer with beautiful custom-made bras and panties in your favorite fabrics and trims, designed to fit your body. 


Categories
All
Archives
March 2024
|

 RSS Feed